(Add missing trench icons) |
(trench roof cost 200bmat) |
||
| (24 intermediate revisions by 7 users not shown) | |||
| Line 1: | Line 1: | ||
| + | {{Version|0.46}} |
||
{{Building Infobox |
{{Building Infobox |
||
| + | |name = Trench (Tier 1) |
||
| − | | image = TrenchT1Icon.png |
||
| + | |image = TrenchT1Icon.png |
||
| − | | map icon = |
||
| − | | |
+ | |caption = The Tier 1 Trench's in-game icon. |
| + | |alt_text = The Tier 1 Trench's in-game icon. |
||
| − | | type = passive defense |
||
| + | |intelligence_icon = |
||
| − | | shovel = (tier 1): 75 |
||
| + | |map_icon = |
||
| − | | bmats = , (tier 2): 30 |
||
| + | |faction = Both |
||
| − | | cmats = , (tier 3): 20 |
||
| + | |type = Passive Defense |
||
| − | | slots = 0 |
||
| + | |buildable = Yes |
||
| − | | strength id = trench |
||
| + | |bmats = |
||
| + | |rmats = |
||
| + | |concrete = |
||
| + | |shovel = 75 |
||
| + | |special_cost = |
||
| + | |built_with = Shovel |
||
| + | |repair = |
||
| + | |slots = |
||
| + | |capacity = |
||
| + | |heat = |
||
| + | |ai_range = |
||
| + | |firing_range = |
||
| + | |firing_range_night = |
||
| + | |retaliation_range = |
||
| + | |cr_buildable = |
||
| + | |cr_bmats = |
||
| + | |cr_rmats = |
||
| + | |cr_time = |
||
| + | |cr_amount = |
||
| + | |hmg = No |
||
| + | |dpl_icon = |
||
| + | |dpl_description = A neutral structure that serves as the basic building block of any trench system. |
||
| + | }} |
||
| + | {{Building Infobox |
||
| + | |name = Trench (Tier 2) |
||
| + | |image = TrenchT2Icon.png |
||
| + | |caption = The Tier 2 Trench's in-game icon. |
||
| + | |alt_text = The Tier 2 Trench's in-game icon. |
||
| + | |intelligence_icon = |
||
| + | |map_icon = |
||
| + | |faction = Both |
||
| + | |type = Passive Defense |
||
| + | |buildable = Yes |
||
| + | |bmats = 30 |
||
| + | |rmats = |
||
| + | |concrete = |
||
| + | |shovel = |
||
| + | |special_cost = |
||
| + | |built_with = Hammer |
||
| + | |repair = |
||
| + | |slots = |
||
| + | |capacity = |
||
| + | |heat = |
||
| + | |ai_range = |
||
| + | |firing_range = |
||
| + | |firing_range_night = |
||
| + | |retaliation_range = |
||
| + | |cr_buildable = |
||
| + | |cr_bmats = |
||
| + | |cr_rmats = |
||
| + | |cr_time = |
||
| + | |cr_amount = |
||
| + | |hmg = No |
||
| + | |dpl_icon = |
||
| + | |dpl_description = Upgraded version of Trench (Tier 1). |
||
| + | }} |
||
| + | {{Building Infobox |
||
| + | |name = Trench (Tier 3) |
||
| + | |image = TrenchT3Icon.png |
||
| + | |caption = The Tier 3 Trench's in-game icon. |
||
| + | |alt_text = The Tier 3 Trench's in-game icon. |
||
| + | |intelligence_icon = |
||
| + | |map_icon = |
||
| + | |faction = Both |
||
| + | |type = Passive Defense |
||
| + | |buildable = Yes |
||
| + | |bmats = |
||
| + | |rmats = |
||
| + | |concrete = 20 |
||
| + | |shovel = |
||
| + | |special_cost = |
||
| + | |built_with = Hammer |
||
| + | |repair = 100 |
||
| + | |slots = |
||
| + | |capacity = |
||
| + | |heat = |
||
| + | |ai_range = |
||
| + | |firing_range = |
||
| + | |firing_range_night = |
||
| + | |retaliation_range = |
||
| + | |cr_buildable = |
||
| + | |cr_bmats = |
||
| + | |cr_rmats = |
||
| + | |cr_time = |
||
| + | |cr_amount = |
||
| + | |hmg = No |
||
| + | |dpl_icon = |
||
| + | |dpl_description = Upgraded version of Trench (Tier 2). |
||
}} |
}} |
||
| − | |||
{{Quote|A fortification built into the ground that can be extended or upgraded into other structures.|In-game description}} |
{{Quote|A fortification built into the ground that can be extended or upgraded into other structures.|In-game description}} |
||
| − | The [[Trench]] is a playermade oblong hole in the ground |
+ | The [[Trench]] is a playermade oblong hole in the ground dug with a [[Shovel]] that give soldiers a good firing position and cover. It is larger than a [[Dug Foxhole]]. |
==Description== |
==Description== |
||
| + | Trenches are a defensive position for soldiers. There are three tier of trenches; Tier 1 is built with a [[Shovel]], it can then be upgraded to Tier 2 via a [[Hammer]] and [[Basic Materials]], and Tier 3 costs [[Concrete Materials]] and a significant amount of time to <abbr title="To let concrete dry and harden">cure</abbr>. |
||
| − | Trenches can be made by equipping a shovel and opening the build menu (default: B). You can rotate the trench as ordinary, but it can also snap to other trenches or bunkers to create longer pathways. Trenches can either join up on their ends or in the middle. However, it should be noted that there are some restrictions on how they can be joined together. |
||
| + | They can be connected to [[Bunker]]s and other trenches, and they can be upgraded with a variety of add-ons. |
||
| − | Trenches can be upgraded by equipping the [[Hammer]] and set it in upgrade mode (switches modes by default: F); you aim at the trench and then press the interaction button (default: E), then select the next tier trench. You can move, fight and build from inside the trench, although it blocks your ability to move to another trench when it is a blueprint. |
||
| + | You can move, fight and build from inside the trench, although it blocks your ability to move to another trench when it is a blueprint. Trenches are neutral structures, if an enemy takes your trench they can use it against you. |
||
| − | Tier 2 and 3 both require Basic and Concrete Materials respectively nonetheless. |
||
| − | + | Standard trenches cannot be built on roads, unlike trench connectors. |
|
| + | [[Tank]]s can cross trenches (except [[Tankette]]]s and [[Scout Tank]]s). Every other vehicle will require the trench to have the "Bridge" add-on installed to be able to cross. |
||
| − | {{clear}} |
||
| + | They are pretty sturdy structures and are very resistant to [[Artillery]] shelling. |
||
| − | {{Building Infobox |
||
| − | | name = Trench connector |
||
| − | | image = TrenchConnectorT1Icon.png |
||
| − | | map icon = |
||
| − | | caption = |
||
| − | | type = passive defense |
||
| − | | shovel = (tier 1): 112 |
||
| − | | bmats = , (tier 2): 75 |
||
| − | | cmats = , (tier 3): 30 |
||
| − | | slots = 0 |
||
| − | | strength id = trench |
||
| − | }} |
||
| + | ==Construction== |
||
| − | ===Trench connector=== |
||
| + | Equip a shovel and open the build menu (default: <code>B</code>). You can rotate the trench with <code>RMB</code>. It can snap to other nearby trenches or bunkers to create longer pathways (hold <code>Shift</code> if you don't want your trench to snap). Trenches can either join up on their ends or in the middle. However, it should be noted that there are some restrictions on how they can be joined together. They cannot be built on steep slopes. |
||
| − | The '''Trench connector''' is similar to the trench in function, but has an irregular shape. They can be used to connect two trenches, two bunkers or a trench and a bunker to each other where a normal trench cannot fit. |
||
| + | Once the blueprint is placed, simple hold <code>LMB</code> to start digging. It will take a total of 75 shovel hits to finish. |
||
| − | Trench connectors can extend up to 7 meters from the center of the connection points. The connector connects on the same spots regular trenches and bunkers would snap. The connector can only be build <u>between</u> two connection points of already finished constructions. If a trench adjacent to the connector gets destroyed and its husks decays, it is possible to construct a connector joined to a connector and new structure. |
||
| + | ==Tier Upgrading== |
||
| − | The cost of the connector is not determined by its length; it is always the same cost. Because it spans less distance than a regular trench would, it is not cost-friendly to frequently use it in defense structures. |
||
| + | Trenches can be upgraded with a [[Hammer]], tier 2 requires 30 Basic Materials and tier 3 requires 20 Concrete Materials. The trench must be at full health for that. |
||
| + | Equip your [[Hammer]] and switch it to "Upgrade Mode" by pressing <code>F</code>, aim at the trench and press the "use" key (default keybind <code>E</code>) to open the trench's upgrade menu. The menu shows the add-ons and upgrade options. Select the Tier upgrade and start hitting the blueprint with your hammer and with the necessary materials in your inventory. If the blueprint is shot before it is completed, it will turn back into the original trench. |
||
| − | The connector can be upgraded just like the regular trench. They can also be upgraded with pipes. However, other trench add-ons are not available for the trench connector. |
||
| − | |||
| − | Trench connectors can be built on roads, to link trenches on the sides of the road, but it doesn't allow soldiers in the trench to pass under the road. |
||
| − | |||
| − | |||
| − | {{clear}} |
||
| − | |||
| − | {{Building Infobox |
||
| − | | name = Trench Emplacement |
||
| − | | image = TrenchEmplacementT1Icon.png |
||
| − | | map icon = |
||
| − | | caption = |
||
| − | | type = passive defense |
||
| − | | shovel = (tier 1): ? |
||
| − | | bmats = , (tier 2): 50 |
||
| − | | cmats = , (tier 3): ? |
||
| − | | slots = 0 |
||
| − | | strength id = trench |
||
| − | }} |
||
| − | |||
| − | ===Trench Emplacement=== |
||
| − | A trench variant with an octagonal shape that can serve as an emplacement for mannable defenses such as [[68mm Anti-Tank Cannon]] or [[14.5 Anti Infantry Flak Gun]]. |
||
| − | |||
| − | {{clear}} |
||
| − | |||
| − | == Upgrading buildings == |
||
| − | The hammer needs to be equipped to upgrade [[buildings]]. When next to a building that can be upgraded by ''pressing <code>F</code>'' you will go into the upgrade-mode. Pressing the "use" key (default keybind <code>E</code>) will place a blueprint in place of the building. The player can then build the upgrade using the hammer and materials from their inventory. If the blueprint is shot before it is completed, it will turn back into the original building. |
||
| − | |||
| − | {| class="wikitable" style="text-align: center; vertical-align: middle;width: 80%;" |
||
| − | |+ <span style="font-size: 150%;">Upgrades</span> |
||
| − | |- style="font-size: 125%;" |
||
| − | ! Tier 1 !! Tier 2 !! Tier 3 |
||
| − | |- |
||
| − | | {{MP Icon|TrenchT1Icon.png|Trench}} |
||
| − | | {{MP Icon|TrenchT2Icon.png|Trench}} |
||
| − | |{{MP Icon|TrenchT3Icon.png|Trench}} |
||
| − | |- |
||
| − | |Required Tool: [[Shovel]] |
||
| − | |[[Hammer]] |
||
| − | |[[Hammer]] |
||
| − | |- |
||
| − | |Cost: N/A |
||
| − | |30 [[Basic Materials]] |
||
| − | |20 [[Concrete Materials]] |
||
| − | |} |
||
== Add-ons == |
== Add-ons == |
||
| + | Add-ons can also be installed with the Hammer. |
||
| − | Trenches can be upgraded with several add-ons simultaneously. Upgrading happens by equipping the hammer and setting it in upgrade mode (switches modes by default: F) and aiming at the trench and selecting the desired upgrade. Your character will go into a short construction animation after which the add-on will appear. The materials will automatically be taken from your [[inventory]]. |
||
| + | |||
| + | Trenches can be upgraded with several add-ons simultaneously. To install add-ons, equip your hammer switch it to "Upgrade Mode" with <code>F</code>, aim at the trench and press <code>E</code> to open the trench's upgrade menu. If there's a direction to choose for the add-on, use <code>Mouse Scroll Wheel</code> while your cursor is on the desired add-on icon to change the direction. Select an add-on and if you have the required materials in your [[inventory]] your character will do a short construction animation after which the add-on will appear. |
||
{| class="wikitable" |
{| class="wikitable" |
||
| + | |+ |
||
| − | |+<span style="font-size: 150%;"></span> |
||
!Name |
!Name |
||
| + | !Icon |
||
| − | !Barbed Wire |
||
| + | !Description |
||
| − | !Bridge |
||
| + | !Cost |
||
| − | !Pipes |
||
| − | !Ramp |
||
|- |
|- |
||
| + | |Barbed Wire |
||
| − | |Image |
||
|[[File:BarbedWireDay.png|75px]] |
|[[File:BarbedWireDay.png|75px]] |
||
| + | |Slows the enemy infantry attempting to invade this Trench. |
||
| + | |{{ResourceDisp|10|Bmats}} |
||
| + | |- |
||
| + | |Sandbags |
||
| + | |[[File:Sandbags.png|75px]] |
||
| + | |A defensive barrier that hinders enemy movement and provides cover during combat. ''Note: Sandbags cover a third the length of a trench, or one side of a trench connector. Soldiers inside a trench cannot shoot over sandbags, and you cannot exit a trench from a side that has sandbags. This means you can be completely trapped if all trench sides have sandbags.'' |
||
| + | |{{ResourceDisp|10|Bmats}} |
||
| + | |- |
||
| + | |Bridge |
||
|[[File:TrenchBridgeIcon.png|75px]] |
|[[File:TrenchBridgeIcon.png|75px]] |
||
| + | |Allows vehicles to cross over this Trench. |
||
| + | |{{ResourceDisp|50|Bmats}} |
||
| + | |- |
||
| + | |Stairs |
||
| + | |{{nowrap|[[File:TrenchT1Ramp.png|75px]][[File:TrenchT2Ramp.png|75px]][[File:TrenchT3Ramp.png|75px]]}} |
||
| + | |Provides easy access into and out of this Trench. |
||
| + | |{{ResourceDisp|30|Bmats}} |
||
| + | |- |
||
| + | |Pipe |
||
|[[File:PipeIcon.png|75px]] |
|[[File:PipeIcon.png|75px]] |
||
| + | |Provides power connections from [[Engine Room]]s to [[Bunker#Modifications|Bunker Upgrades]]. |
||
| − | |{{nowrap|[[File:TrenchT1Ramp.png|75x75px]] [[File:TrenchT2Ramp.png|75x75px]][[File:TrenchT3Ramp.png|75x75px]]}} |
||
| + | |{{ResourceDisp|30|Bmats}} |
||
|- |
|- |
||
| + | |Trench Roof |
||
| − | |Cost |
||
| + | |[[File:TrenchRoofIcon.png|75px]] |
||
| − | |10 [[Basic Materials]] |
||
| + | |Provides cover against enemies that have entered this Bunker. |
||
| − | |50 [[Basic Materials]] |
||
| + | |{{ResourceDisp|200|Bmats}} |
||
| − | |30 [[Basic Materials]] |
||
| − | |30 [[Basic Materials]] |
||
|- |
|- |
||
| + | |Fill In |
||
| − | |Description |
||
| + | |[[File:TrenchFillInIcon.png|75px]] |
||
| − | |Slows down enemy infantry attempting to invade the Trench. |
||
| + | |Fills in this Trench, restoring the landscape around it. ''Note: Works on Tier 1 Trenchs or Husks of any tier. Creates a blueprint over the trench, this blueprint must be dug with <code>LMB</code> to fill the trench.'' |
||
| − | |Allows Vehicles to cross over the Trench. |
||
| + | |N/A |
||
| − | |Provides power connections from Engine Rooms to Bunker Upgrades. |
||
| − | |Allows to exit trenches faster |
||
|} |
|} |
||
| − | == Notes == |
||
| + | ==Reservation [[File:TrenchReservationIcon.png|30px]]== |
||
| − | Tier 1 trenches (and trench connectors) without the bridge add-on can be destroyed with most land vehicles (except [[Bicycle]] and [[Motorcycle]]) by running over them . Similarly, Tier 2 trenches without bridge add-on can be destroyed by tracked vehicles ([[Landing APC]], [[Half-Track]], [[Light Tank]], and [[Battle Tank]]). |
||
| + | |||
| + | Like [[Bunker]]s, trenches can be reserved through a button in the hammer or shovel's upgrade menu so that only the original builder and the players in their squad can modify the trench. The reservation lasts 48 hours but it can be refreshed at any moment by the original builder or their squad mates. |
||
| + | Only the original builder can remove the reservation. |
||
| + | |||
| + | ==Demolishing [[File:TrenchDemolishIcon.png|30px]]== |
||
| + | |||
| + | Reserved Trenches that are less then 3 hours old can be demolished by the original builder or members of their squad through a button in the hammer or shovel's upgrade menu. There must be no enemies nearby and it doesn't work for concrete trench. The demolition is instantaneous unlike the "Fill In" option. |
||
| + | |||
| + | |||
| + | == Trench Variants == |
||
| + | |||
| + | ===Trench Connector=== |
||
| + | |||
| + | The [[Trench Connector]] is similar to the trench in function, but has an irregular shape. They can be used to connect two trenches, two bunkers or a trench and a bunker to each other where a normal trench cannot fit. |
||
| + | |||
| + | Trench connectors can be built on roads, to link trenches on the sides of the road, but it doesn't allow soldiers in the trench to pass under the road. |
||
| + | |||
| + | {{See|Trench Connector}} |
||
| + | |||
| + | ===Trench Emplacement=== |
||
| + | |||
| + | The [[Trench Emplacement]] trench variant with an octagonal shape that can serve as an emplacement for mannable defenses such as [[68mm Anti-Tank Cannon]] , [[12.7mm Anti Infantry Flak Gun|12.7 Anti Infantry Flak Gun]], or an emplaced artillery piece. When placed inside this structure, the mannable defences/artillery pieces get more [[Structure Health|health]] (can take more damage) |
||
| + | |||
| + | {{See|Trench Emplacement}} |
||
| + | |||
| + | {{clear}}<br/> |
||
| + | |||
| + | == Trench Husk == |
||
| + | When a trench is destroyed, it leaves behind a husk. The trench can be rebuilt from the husk by using the hammer in upgrade mode and pressing <code>E</code>. This will replace the husk with a trench blueprint at the tier it used to have, for the cost of that tier (e.g. shoveling for Tier 1, Hammer and 30 bmats for Tier 2). All previously installed add-ons are lost and must be reinstalled after trench reconstruction, at normal cost. |
||
| + | |||
| + | Husks can also be filled in with a shovel via the option in the upgrade menu. |
||
| + | |||
| + | Husks can also be destroyed with explosives, to make space for different structures for example. The trench husk has the same max health as the trench it comes from. Or you can wait for [[decay]] to destroy it. Husk decay cannot be prevented and is usually the same speed as the decay near region borders. |
||
| + | <br /> |
||
| Line 131: | Line 216: | ||
File:Tier 1 trenches.jpg|Tier 2 Bunkers and Trenches used in combination. |
File:Tier 1 trenches.jpg|Tier 2 Bunkers and Trenches used in combination. |
||
File:Trench blueprint.jpg|Trench Blueprint, Shovel required to build. |
File:Trench blueprint.jpg|Trench Blueprint, Shovel required to build. |
||
| − | File:Bunker & Trench showcase.jpg |
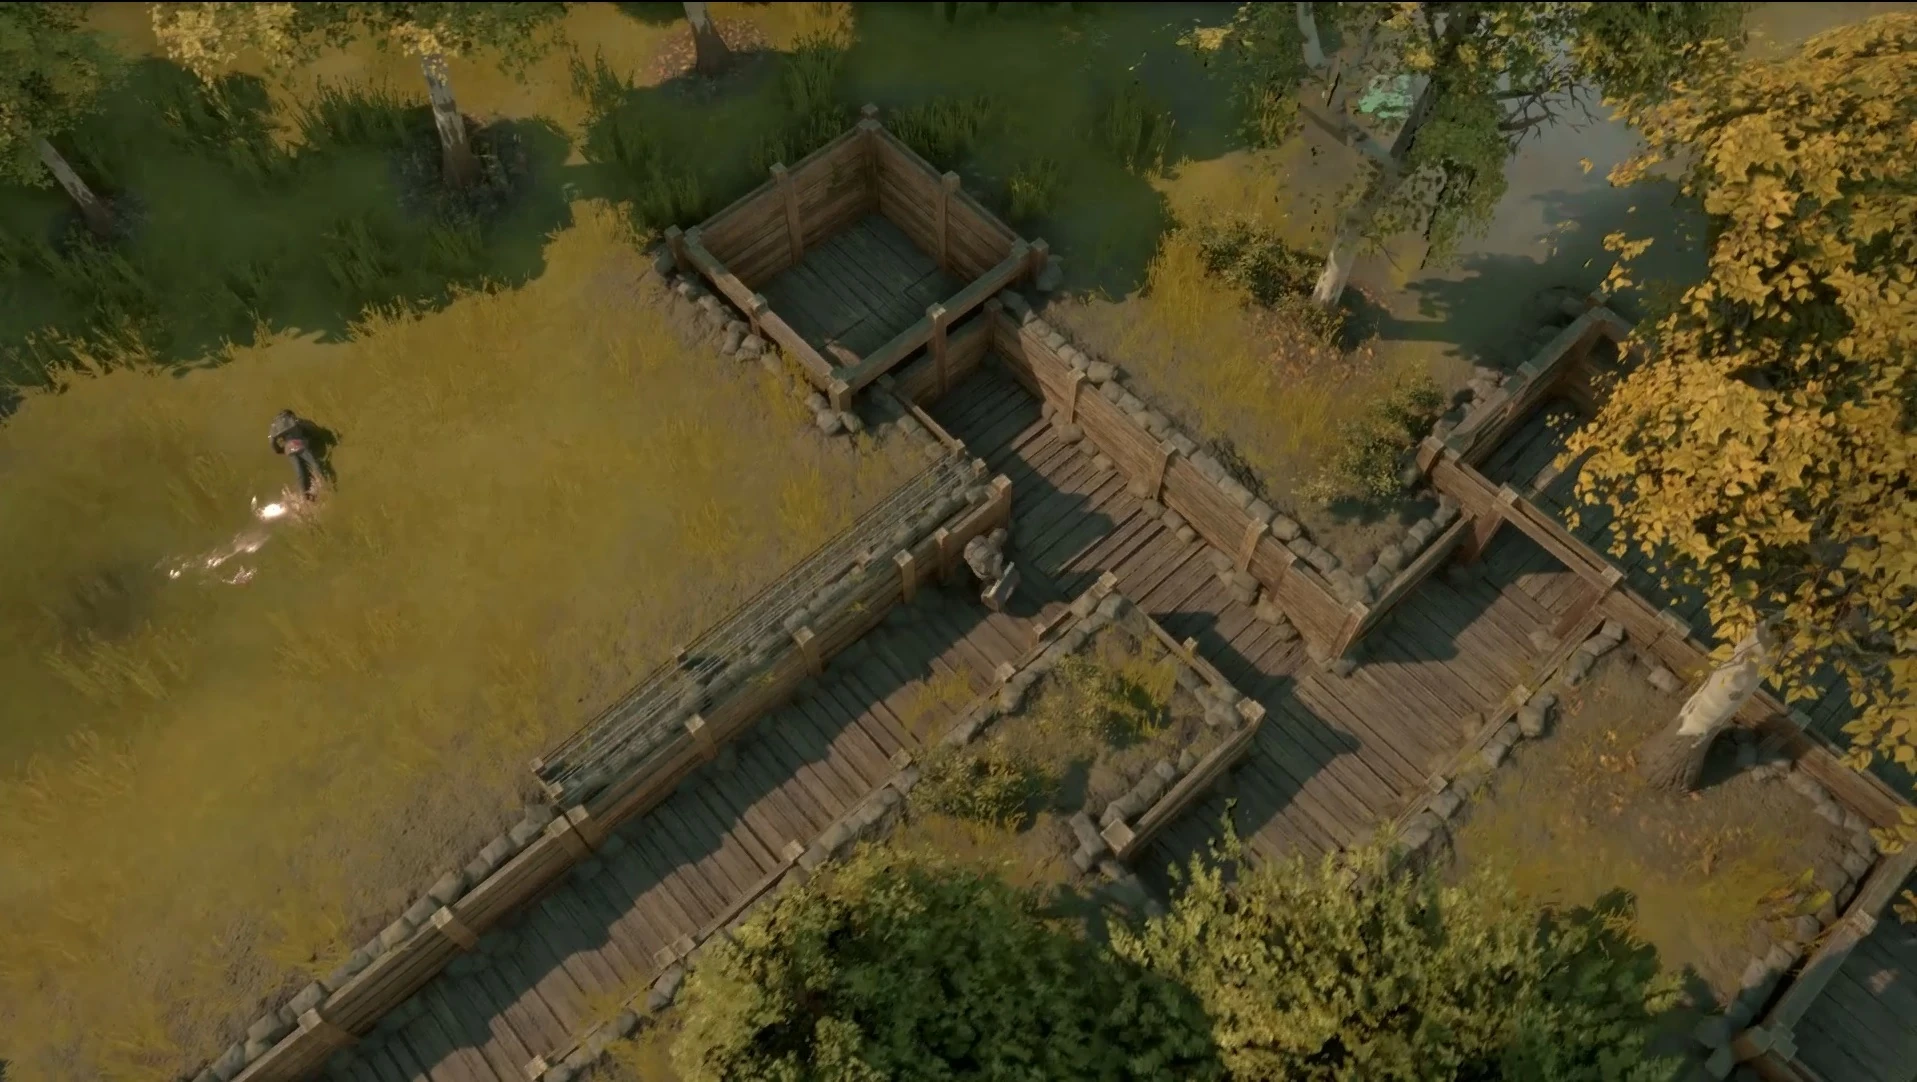
+ | File:Bunker & Trench showcase.jpg|Various upgrades: (in order) [[Rifle Garrison|Tier 1 Garrison]], [[Machine Gun Garrison|Tier 2 Machinegun]], [[AT Gun Garrison|Tier 3 AT]], [[Bunker#Engine Room|Engine room]]; Firing Ports, Doorway, Treches with Barbed Wire, a Trench Bridge, and Pipes. |
File:Trench connector two joined together.png|Two trench connectors joined together by destroying one of the original parent trenches. |
File:Trench connector two joined together.png|Two trench connectors joined together by destroying one of the original parent trenches. |
||
File:Connector blueprint.PNG|The "blue print" of the Tier 1 trench connector |
File:Connector blueprint.PNG|The "blue print" of the Tier 1 trench connector |
||
File:Trench Stairs.png|Trench Stairs |
File:Trench Stairs.png|Trench Stairs |
||
| + | File:Trench Bunker Husk.png|Tier 1 Trench and Bunker husks |
||
| + | File:Trench Upgrade Menu.png|Trench upgrade and add-on menu |
||
</gallery> |
</gallery> |
||
| − | [[Category: |
+ | [[Category:Trenches]] |
{{Buildings Navbox}} |
{{Buildings Navbox}} |
||
Revision as of 14:32, 14 October 2021
This article could contain outdated information that is inaccurate for the current version (1.52) of the game. It was last updated for 0.46.
| “ | A fortification built into the ground that can be extended or upgraded into other structures. | „ |
| — In-game description |
The Trench is a playermade oblong hole in the ground dug with a Shovel that give soldiers a good firing position and cover. It is larger than a Dug Foxhole.
Description
Trenches are a defensive position for soldiers. There are three tier of trenches; Tier 1 is built with a Shovel, it can then be upgraded to Tier 2 via a Hammer and Basic Materials, and Tier 3 costs Concrete Materials and a significant amount of time to cure.
They can be connected to Bunkers and other trenches, and they can be upgraded with a variety of add-ons.
You can move, fight and build from inside the trench, although it blocks your ability to move to another trench when it is a blueprint. Trenches are neutral structures, if an enemy takes your trench they can use it against you.
Standard trenches cannot be built on roads, unlike trench connectors.
Tanks can cross trenches (except Tankette]s and Scout Tanks). Every other vehicle will require the trench to have the "Bridge" add-on installed to be able to cross.
They are pretty sturdy structures and are very resistant to Artillery shelling.
Construction
Equip a shovel and open the build menu (default: B). You can rotate the trench with RMB. It can snap to other nearby trenches or bunkers to create longer pathways (hold Shift if you don't want your trench to snap). Trenches can either join up on their ends or in the middle. However, it should be noted that there are some restrictions on how they can be joined together. They cannot be built on steep slopes.
Once the blueprint is placed, simple hold LMB to start digging. It will take a total of 75 shovel hits to finish.
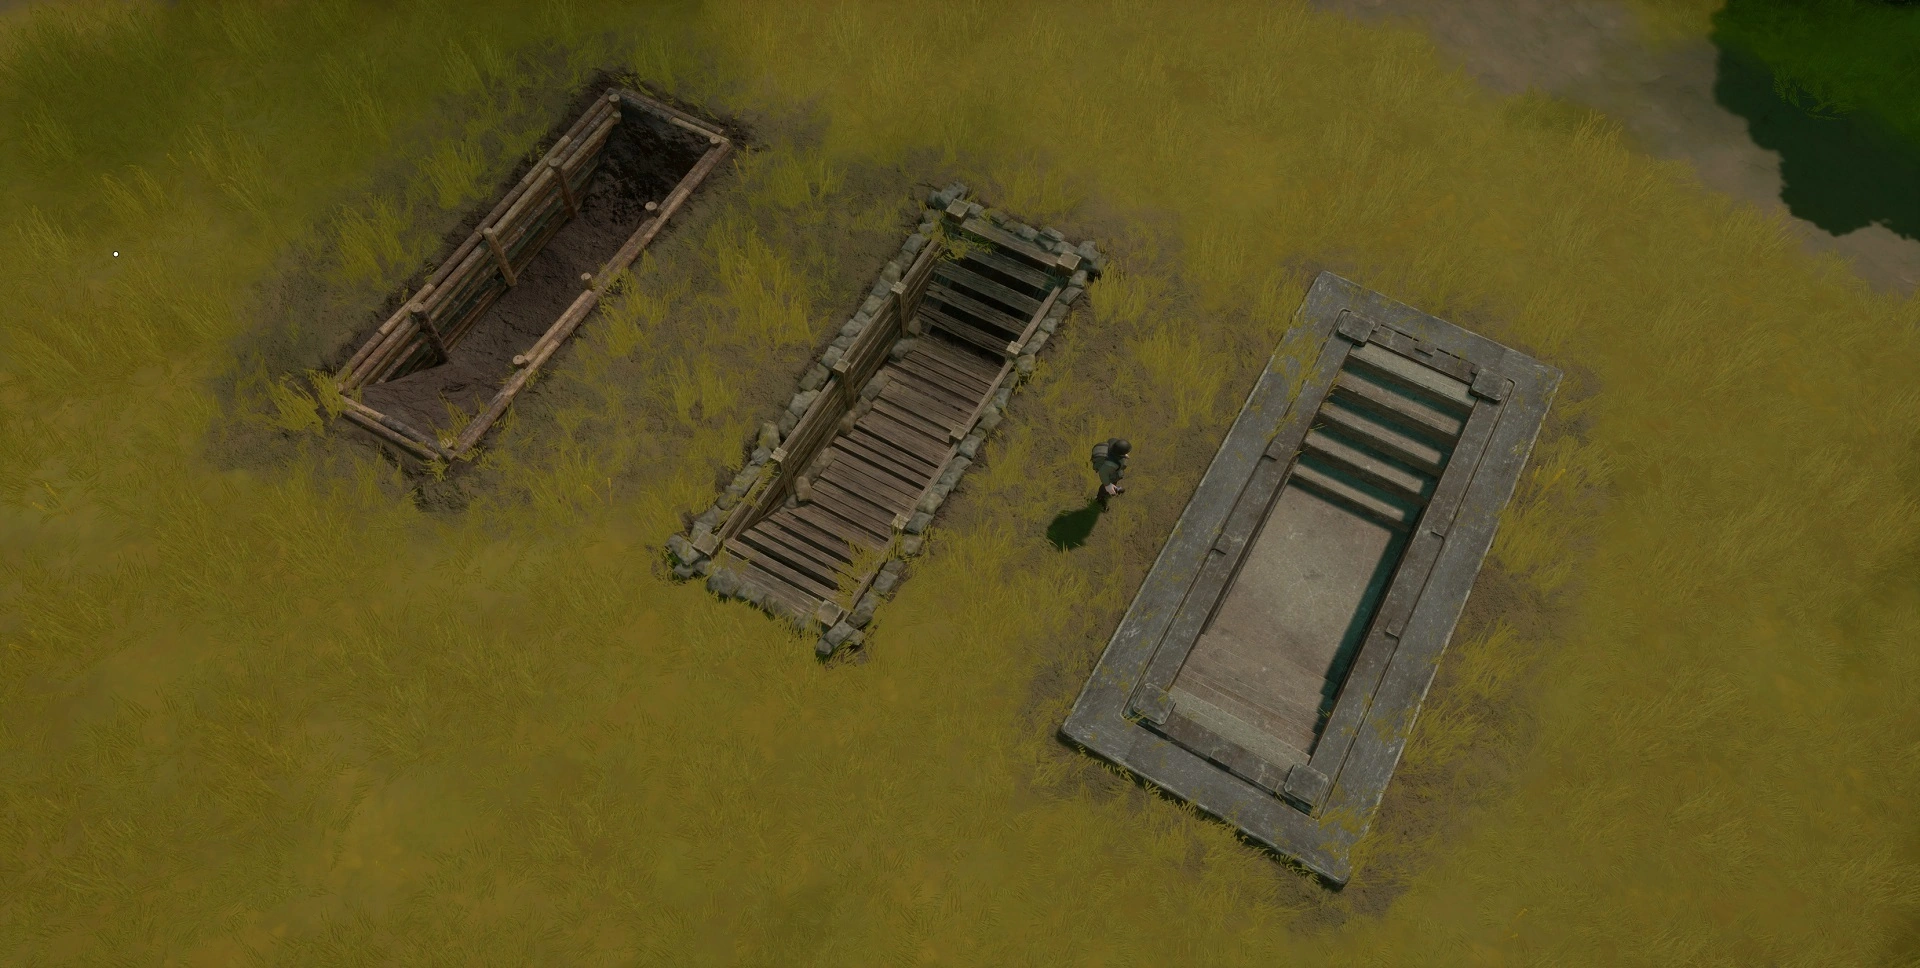
Tier Upgrading
Trenches can be upgraded with a Hammer, tier 2 requires 30 Basic Materials and tier 3 requires 20 Concrete Materials. The trench must be at full health for that.
Equip your Hammer and switch it to "Upgrade Mode" by pressing F, aim at the trench and press the "use" key (default keybind E) to open the trench's upgrade menu. The menu shows the add-ons and upgrade options. Select the Tier upgrade and start hitting the blueprint with your hammer and with the necessary materials in your inventory. If the blueprint is shot before it is completed, it will turn back into the original trench.
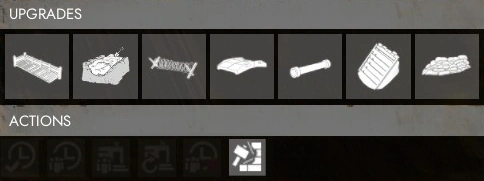
Add-ons
Add-ons can also be installed with the Hammer.
Trenches can be upgraded with several add-ons simultaneously. To install add-ons, equip your hammer switch it to "Upgrade Mode" with F, aim at the trench and press E to open the trench's upgrade menu. If there's a direction to choose for the add-on, use Mouse Scroll Wheel while your cursor is on the desired add-on icon to change the direction. Select an add-on and if you have the required materials in your inventory your character will do a short construction animation after which the add-on will appear.
| Name | Icon | Description | Cost |
|---|---|---|---|
| Barbed Wire | 
|
Slows the enemy infantry attempting to invade this Trench. | 10 |
| Sandbags | 
|
A defensive barrier that hinders enemy movement and provides cover during combat. Note: Sandbags cover a third the length of a trench, or one side of a trench connector. Soldiers inside a trench cannot shoot over sandbags, and you cannot exit a trench from a side that has sandbags. This means you can be completely trapped if all trench sides have sandbags. | 10 |
| Bridge | 
|
Allows vehicles to cross over this Trench. | 50 |
| Stairs |   
|
Provides easy access into and out of this Trench. | 30 |
| Pipe | 
|
Provides power connections from Engine Rooms to Bunker Upgrades. | 30 |
| Trench Roof | 
|
Provides cover against enemies that have entered this Bunker. | 200 |
| Fill In | 
|
Fills in this Trench, restoring the landscape around it. Note: Works on Tier 1 Trenchs or Husks of any tier. Creates a blueprint over the trench, this blueprint must be dug with LMB to fill the trench.
|
N/A |
Reservation 
Like Bunkers, trenches can be reserved through a button in the hammer or shovel's upgrade menu so that only the original builder and the players in their squad can modify the trench. The reservation lasts 48 hours but it can be refreshed at any moment by the original builder or their squad mates. Only the original builder can remove the reservation.
Demolishing
Reserved Trenches that are less then 3 hours old can be demolished by the original builder or members of their squad through a button in the hammer or shovel's upgrade menu. There must be no enemies nearby and it doesn't work for concrete trench. The demolition is instantaneous unlike the "Fill In" option.
Trench Variants
Trench Connector
The Trench Connector is similar to the trench in function, but has an irregular shape. They can be used to connect two trenches, two bunkers or a trench and a bunker to each other where a normal trench cannot fit.
Trench connectors can be built on roads, to link trenches on the sides of the road, but it doesn't allow soldiers in the trench to pass under the road.
Trench Emplacement
The Trench Emplacement trench variant with an octagonal shape that can serve as an emplacement for mannable defenses such as 68mm Anti-Tank Cannon , 12.7 Anti Infantry Flak Gun, or an emplaced artillery piece. When placed inside this structure, the mannable defences/artillery pieces get more health (can take more damage)
Trench Husk
When a trench is destroyed, it leaves behind a husk. The trench can be rebuilt from the husk by using the hammer in upgrade mode and pressing E. This will replace the husk with a trench blueprint at the tier it used to have, for the cost of that tier (e.g. shoveling for Tier 1, Hammer and 30 bmats for Tier 2). All previously installed add-ons are lost and must be reinstalled after trench reconstruction, at normal cost.
Husks can also be filled in with a shovel via the option in the upgrade menu.
Husks can also be destroyed with explosives, to make space for different structures for example. The trench husk has the same max health as the trench it comes from. Or you can wait for decay to destroy it. Husk decay cannot be prevented and is usually the same speed as the decay near region borders.
Gallery
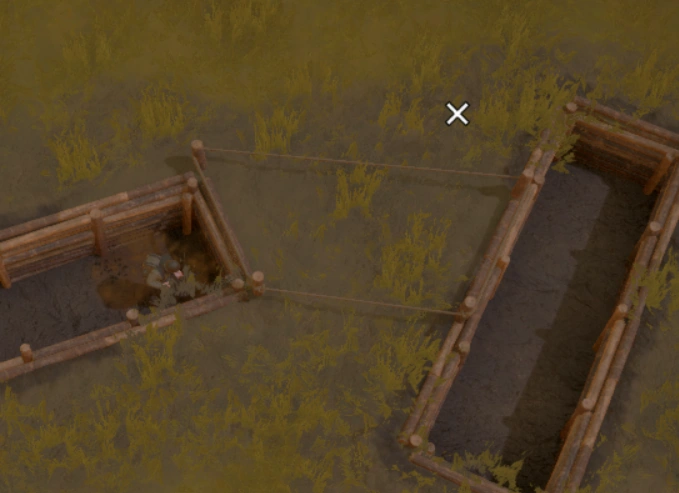
Tier 2 Bunkers and Trenches used in combination.
Trench Blueprint, Shovel required to build.
Various upgrades: (in order) Tier 1 Garrison, Tier 2 Machinegun, Tier 3 AT, Engine room; Firing Ports, Doorway, Treches with Barbed Wire, a Trench Bridge, and Pipes.
Two trench connectors joined together by destroying one of the original parent trenches.
The "blue print" of the Tier 1 trench connector
Trench Stairs
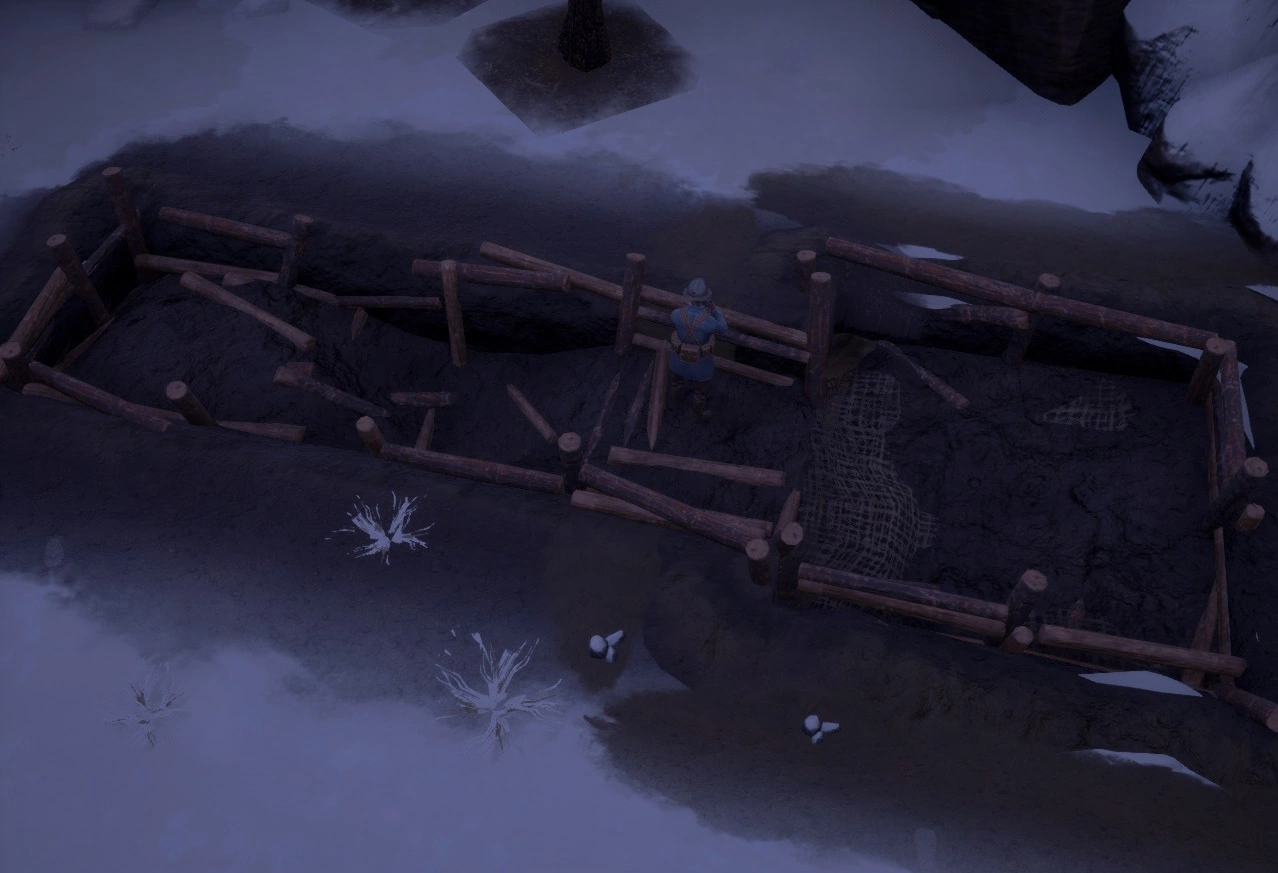
Tier 1 Trench and Bunker husks
Trench upgrade and add-on menu

| ||||||||||||||||||||||||||||||||||||||||||||