(Replaced content with "=== <big>Julian Galarza fué el creador de los bunkers</big> === Category:Bunkers") Tags: Replaced Visual edit |
(bunker husk can't be filled in) |
||
| (15 intermediate revisions by 8 users not shown) | |||
| Line 1: | Line 1: | ||
| + | {{Version|0.47}} |
||
| − | === <big>Julian Galarza fué el creador de los bunkers</big> === |
||
| + | {{Building Infobox |
||
| + | |name = Bunker (Tier 1) |
||
| + | |image = BunkerT1Icon.png |
||
| + | |caption = The Tier 1 Bunker's in-game icon. |
||
| + | |alt_text = The Tier 1 Bunker's in-game icon. |
||
| + | |intelligence_icon = |
||
| + | |map_icon = |
||
| + | |faction = Both |
||
| + | |type = Defense |
||
| + | |buildable = Yes |
||
| + | |bmats = |
||
| + | |rmats = |
||
| + | |concrete = |
||
| + | |shovel = 75 |
||
| + | |special_cost = |
||
| + | |built_with = Shovel |
||
| + | |repair = 75 |
||
| + | |slots = |
||
| + | |capacity = |
||
| + | |heat = |
||
| + | |ai_range = |
||
| + | |firing_range = |
||
| + | |firing_range_night = |
||
| + | |retaliation_range = |
||
| + | |cr_buildable = |
||
| + | |cr_bmats = |
||
| + | |cr_rmats = |
||
| + | |cr_time = |
||
| + | |cr_amount = |
||
| + | |hmg = Yes |
||
| + | |dpl_icon = |
||
| + | |dpl_description = A rectangular structure partly in the ground built with a shovel. Possess many upgrade options. |
||
| + | }} |
||
| + | {{Building Infobox |
||
| + | |name = Bunker (Tier 2) |
||
| + | |image = BunkerT2Icon.png |
||
| + | |caption = The Tier 2 Bunker's in-game icon. |
||
| + | |alt_text = The Tier 2 Bunker's in-game icon. |
||
| + | |intelligence_icon = |
||
| + | |map_icon = |
||
| + | |faction = Both |
||
| + | |type = Defense |
||
| + | |buildable = Yes |
||
| + | |bmats = 75 |
||
| + | |rmats = |
||
| + | |concrete = |
||
| + | |shovel = |
||
| + | |special_cost = |
||
| + | |built_with = Hammer |
||
| + | |repair = 75 |
||
| + | |slots = |
||
| + | |capacity = |
||
| + | |heat = |
||
| + | |ai_range = |
||
| + | |firing_range = |
||
| + | |firing_range_night = |
||
| + | |retaliation_range = |
||
| + | |cr_buildable = |
||
| + | |cr_bmats = |
||
| + | |cr_rmats = |
||
| + | |cr_time = |
||
| + | |cr_amount = |
||
| + | |hmg = No |
||
| + | |dpl_icon = |
||
| + | |dpl_description = Upgraded version of Bunker (Tier 1). |
||
| + | }} |
||
| + | {{Building Infobox |
||
| + | |name = Bunker (Tier 3) |
||
| + | |image = BunkerT3Icon.png |
||
| + | |caption = The Tier 3 Bunker's in-game icon. |
||
| + | |alt_text = The Tier 3 Bunker's in-game icon. |
||
| + | |intelligence_icon = |
||
| + | |map_icon = |
||
| + | |faction = Both |
||
| + | |type = Defense |
||
| + | |buildable = Yes |
||
| + | |bmats = |
||
| + | |rmats = |
||
| + | |concrete = 30 |
||
| + | |shovel = |
||
| + | |special_cost = |
||
| + | |built_with = Hammer |
||
| + | |repair = 125 |
||
| + | |slots = |
||
| + | |capacity = |
||
| + | |heat = |
||
| + | |ai_range = |
||
| + | |firing_range = |
||
| + | |firing_range_night = |
||
| + | |retaliation_range = |
||
| + | |cr_buildable = |
||
| + | |cr_bmats = |
||
| + | |cr_rmats = |
||
| + | |cr_time = |
||
| + | |cr_amount = |
||
| + | |hmg = No |
||
| + | |dpl_icon = |
||
| + | |dpl_description = Upgraded version of Bunker (Tier 2). |
||
| + | }} |
||
| + | {{Quote|An underground shelter that serve as foundation for permanent fortifications. Connects to other Bunker and Trenches.|In-game description}} |
||
| + | |||
| + | The [[Bunker]] is a player made rectangle structure, partly in the ground. There exist 3 tiers of bunkers; the first is dug with a [[Shovel]], the second is upgraded via [[Basic Materials]] and the third tier costs [[Concrete Materials]] and a significant amount of time to <abbr>cure</abbr>. They can be upgraded with add-ons or converted to other types of structures like garrisons. Bunkers can also be connected to [[Trench|Trenches]]. |
||
| + | |||
| + | == Description == |
||
| + | The [[Bunker]] can be made by equipping a shovel and opening the build menu (default: B). You can rotate the bunkers as you would with normal structures, but it can also snap to bunkers or to trenches (hold <code>Shift</code> to disable snapping). If you directly join two bunkers together, the wall between them disappears and the two sections become one single structure with shared health. If one of the parts gets destroyed, they all get destroyed. |
||
| + | |||
| + | There is no limit on the amount of bunkers you can link together, however, their Structural Integrity will decrease. This results in the structure having less health; the health of a 2-bunker structure is lower than the sum of the health of two separate single bunkers. The Structural Integrity will decrease quicker for low tier bunkers than for higher tiers. |
||
| + | |||
| + | Bunkers can be repaired using a hammer and [[Basic Materials]]. Upgrading a T1 bunker into a garrison or into Tier 2 requires [[Basic Materials]]. Tier 3 bunkers require [[Concrete Materials]]. |
||
| + | |||
| + | [[Bunker Corner]]s are an alternative type of Bunkers in a some-what triangular rather than square shape. |
||
| + | |||
| + | |||
| + | == Structural integrity == |
||
| + | When you go into the upgrade-mode, you can see bunker's approximate structural integrity in text such as high, medium, low, and critical. |
||
| + | |||
| + | The max health of a bunker structure is equal to the sum of the max health of each directly-connected bunkers multiplied by the structural integrity value. |
||
| + | {| class="wikitable" |
||
| + | |+ |
||
| + | <big>Structural Integrity</big> |
||
| + | !Text |
||
| + | !Value (approx) |
||
| + | |- |
||
| + | |High |
||
| + | |100%~75% |
||
| + | |- |
||
| + | |Medium |
||
| + | |75%~50% |
||
| + | |- |
||
| + | |Low |
||
| + | |50%~25% |
||
| + | |- |
||
| + | |Critical |
||
| + | |Under 25% |
||
| + | |} |
||
| + | Factors affecting structural integrity include: |
||
| + | * '''Bunker tier''' (higher tier keep higher integrity) |
||
| + | * '''Number of connected bunkers''' (the more pieces, the lower the integrity) |
||
| + | * '''Number of bunker garrisons, ammo rooms, and engine rooms''' (they decrease integrity) |
||
| + | |||
| + | Factors that do no affect structural integrity: shape of the bunker and add-ons. |
||
| + | |||
| + | |||
| + | You should never let your bunkers reach Critical as your bunker's health and repair costs will suffer. Reaching Low is not advised, and adding more bunker pieces past Low integrity does not give more health to your bunker. |
||
| + | |||
| + | |||
| + | As a rule of thumb, a Tier 1 Bunker should not use more than 4 pieces and never more than 7. Tier 2 Bunker should not use more than 12 pieces and never more than 20. Tier 3 Bunkers are such that the number of pieces is virtually not an issue. |
||
| + | |||
| + | When modifying a bunker, each upgrade's description mention a "Structural Integrity Rating" to indicate the relative impact of each type of modification on the Structural Integrity. "High - High" means a relatively low impact whereas "High - Critical" means a very significant decrease in structual integrity. |
||
| + | |||
| + | <br /> |
||
| + | |||
| + | == Upgrading Bunkers == |
||
| + | The hammer needs to be equipped to upgrade Bunkers. Press <code>F</code> to switch the hammer to Upgrade Mode. When next to a bunker, aim at it and press the "use" key (default keybind <code>E</code>) to open the bunker upgrades menu. For options that have a direction put your cursor on the particular option and use the <code>Mouse Wheel</code> to choose the desired direction. Press <code>LMB</code> to select the option. If the upgrade is simply an [[Bunker#Add-ons|Add-On]], it will be installed after your character does a short animation (and if you have the required materials). For other upgrades you must hit the blueprint with your hammer while having the required materials in your inventory. If the blueprint is shot enough before it is completed, it will turn back into the original building. |
||
| + | |||
| + | === Tier Upgrades === |
||
| + | |||
| + | {| class="wikitable" style="text-align: center; vertical-align: middle;width: 80%;" |
||
| + | |- style="font-size: 125%;" |
||
| + | ! Tier 1 !! Tier 2 !! Tier 3 |
||
| + | |- |
||
| + | | {{MP Icon|BunkerT1Icon.png|Bunker}} |
||
| + | | {{MP Icon|BunkerT2Icon.png|Bunker}} |
||
| + | | {{MP Icon|BunkerT3Icon.png|Bunker}} |
||
| + | |- |
||
| + | |Required tool: [[Shovel]] |
||
| + | |[[Hammer]] |
||
| + | |[[Hammer]] |
||
| + | |- |
||
| + | |Cost: N/A |
||
| + | |75 [[Basic Materials|Basic Material]] |
||
| + | |30 [[Concrete Materials]] |
||
| + | |} |
||
| + | |||
| + | === Add-ons === |
||
| + | Similar to the Trench, the bunker can be upgraded with a set of add-ons. The upgrades consists of Pipes, a door and a firing hole. The latter two can be build on all sides of the bunker by scrolling the mouse wheel; the door requires to be connected to a trench. Building the add-ons is similar to upgrading, but when selected your character will go into a short construction animation after which the add-on will appear. The materials will automatically be taken from your [[Player#Backpack|inventory]]. |
||
| + | |||
| + | {| class="wikitable" |
||
| + | |+ |
||
| + | !Name |
||
| + | !Icon |
||
| + | !Description |
||
| + | !Cost |
||
| + | |- |
||
| + | |Doorway |
||
| + | |{{nowrap|[[File:BunkerT1DoorwayIcon.png|75px]][[File:BunkerT2DoorwayIcon.png|75px]][[File:BunkerT3DoorwayIcon.png|75px]]}} |
||
| + | |Provides entry into this Bunker. |
||
| + | |{{ResourceDisp|20|bmats}} |
||
| + | |- |
||
| + | |Firing Port |
||
| + | |{{nowrap|[[file:BunkerT1FiringPortIcon.png|75px]][[File:BunkerT2FiringPortIcon.png|75px]][[File:BunkerT3FiringPortIcon.png|75px]]}} |
||
| + | |Allows infantry weapons to be fired from the safety of this bunker. |
||
| + | |{{ResourceDisp|20|bmats}} |
||
| + | |- |
||
| + | |Pipes |
||
| + | |{{nowrap|[[file:PipeIcon.png|75px]]}} |
||
| + | |Provides power connections from Engine Rooms to [[Storm Cannon|Storm Cannons]]. |
||
| + | |{{ResourceDisp|30|bmats}} |
||
| + | |- |
||
| + | |Interior Firing Port |
||
| + | |[[File:BunkerT3InteriorFiringPortIcon.png|75px]] |
||
| + | |Provides cover against enemies that have entered this Bunker. Tier 3 only. |
||
| + | |{{ResourceDisp|10|bmats}} |
||
| + | |- |
||
| + | |Stairs |
||
| + | |[[file:BunkerT2StairsIcon.png|75px]] |
||
| + | |Allows easy access to the roof of this bunker. Only Tier 2 and 3. |
||
| + | |{{ResourceDisp|30|bmats}} |
||
| + | |- |
||
| + | |Ladder |
||
| + | |[[file:BunkerT2LadderIcon.png|75px]] |
||
| + | |Permits access into this Bunker from the roof. |
||
| + | |{{ResourceDisp|30|bmats}} |
||
| + | |- |
||
| + | |Sandbags |
||
| + | |[[File:Sandbags.png|75x75px]] |
||
| + | |Bunker Sandbags gives a secure firing position on the roof while preventing enemies from climbing onto your bunker. |
||
| + | |{{ResourceDisp|10|bmats}} |
||
| + | |- |
||
| + | |} |
||
| + | |||
| + | === Modifications === |
||
| + | Beside upgrading the tier or placing add-ons, the Bunker can also be modified. This ranges from adding a spawn point with the Bunker Base to adding active defenses, as well as placing the mighty Storm Canon. Below you can find a list of all the various modifications. It should be noted that some defenses cannot be constructed on all tiers. There is no way to remove a modification from a bunker. Placing a modification will erase all add-ons and infrastructure modification placed in that bunker; the spent materials will be lost. |
||
| + | |||
| + | When adding Garrisons to your bunker complex, be aware that they cannot be directly adjacent to each other. There can also only be one Bunker Base per complex. |
||
| + | {| class="wikitable" |
||
| + | |+ |
||
| + | !Name |
||
| + | !Tiers |
||
| + | !Icon |
||
| + | !Description |
||
| + | |- |
||
| + | |[[Bunker Base]] |
||
| + | |1-3 |
||
| + | |{{nowrap|[[File:BunkerBaseIcon.png|75px]][[File:BunkerBaseT2Icon.png|75px]][[File:BunkerBaseT3Icon.png|75px]]}} |
||
| + | |A large forward operating base. Players can spawn and stockpile items here. Only buildable on T1 bunkers. |
||
| + | |- |
||
| + | |[[Bunker Ramp]] |
||
| + | |1-3 |
||
| + | |{{nowrap|[[File:BunkerT1RampIcon.png|75px]][[File:BunkerT2RampIcon.png|75px]][[File:BunkerT3RampIcon.png|75px]]}} |
||
| + | |A ramp that provides access to underground Bunkers. |
||
| + | |- |
||
| + | |[[Bunker Corner]] |
||
| + | |2-3 |
||
| + | |{{nowrap|[[File:BunkerCornerT2Icon.png|75px]][[File:BunkerCornerT3Icon.png|75px]]}} |
||
| + | |Makes the bunker triangular. Tier 1 built with shovel. |
||
| + | |- |
||
| + | |[[Rifle Garrison]] |
||
| + | |1-3 |
||
| + | |{{nowrap|[[File:BunkerT1RifleGarrisonIcon.png|75px]][[File:BunkerT2RifleGarrisonIcon.png|75px]][[File:BunkerT3RifleGarrisonIcon.png|75px]]}} |
||
| + | |An entrenched bunker manned by stationed troops armed with Rifles. |
||
| + | |- |
||
| + | |[[Machine Gun Garrison]] |
||
| + | |1-3 |
||
| + | |{{nowrap|[[File:BunkerT1MGGarrisonIcon.png|75px]][[File:BunkerT2MGGarrisonIcon.png|75px]][[File:BunkerT3MGGarrisonIcon.png|75px]]}} |
||
| + | |An entrenched [[Machine Gun]] emplacement manned by stationed troops. |
||
| + | |- |
||
| + | |[[AT Gun Garrison]] |
||
| + | |2-3 |
||
| + | |{{nowrap|[[File:BunkerT2ATGunIcon.png|75px]][[File:BunkerT3ATGunIcon.png|75px]]}} |
||
| + | |An entrenched AT gun manned by stationed troops. |
||
| + | |- |
||
| + | |[[Observation Bunker]] |
||
| + | |2-3 |
||
| + | |{{nowrap|[[File:ObservationBunkerT2Icon.png|75px]][[File:ObservationBunkerT3Icon.png|75px]]}} |
||
| + | |A radio bunker that provides intel to friendly units about the surrounding area. Reinforced with wood, it can withstand more punishment than a standard radio tower, and therefore is capable of increased effectiveness. |
||
| + | |- |
||
| + | |[[Engine Room]] |
||
| + | |2-3 |
||
| + | |{{nowrap|[[File:Engine RoomIcon.png|75px]]}} |
||
| + | |A engineering facility that provides power to Bunker structures using pipe connections. |
||
| + | |- |
||
| + | |[[Ammo Room]] |
||
| + | |3 |
||
| + | |{{nowrap|[[File:BunkerT3AmmoRoomIcon.png|75px]]}} |
||
| + | |A Bunker Room designed to hold large amounts of artillery shells. Shell crates can be submitted there directly. |
||
| + | |- |
||
| + | |[[Howitzer Garrison]] |
||
| + | |3 |
||
| + | |{{nowrap|[[File:BunkerT3ArtilleryGarrisonIcon.png|75px]]}} |
||
| + | |An entrenched [[Howitzer]] emplacement manned by station troops. |
||
| + | |- |
||
| + | |[[Storm Cannon]] |
||
| + | |3 |
||
| + | |{{nowrap|[[File:StormCannonIcon.png|75px]]}} |
||
| + | |A heavy fixed position artillery that can release devastating firepower on distant enemy targets. Requires 3 by 3 bunker complex to be build. |
||
| + | |- |
||
| + | |[[Intelligence Center]] |
||
| + | |3 |
||
| + | |[[File:IntelligenceCenterIcon.png|75px]] |
||
| + | |A high-tech listening post designed to intercept and decode enemy transmissions. The intelligence Center can target distant locations and will continue to decipher sensitive transmissions over a sustained period. |
||
| + | |- |
||
| + | |} |
||
| + | <br /> |
||
| + | |||
| + | === Infrastructure Modifications === |
||
| + | Within the Upgrades section there are also '''Infrastructure Modifications''', a list of which can be found in the table below. Depending on their Infrastructure Type, they give different upgrades. Each Infrastructure Modification gives 1 modification point and costs {{ResourceDisp|50|bmats}} to build. |
||
| + | |||
| + | Garrison Upgrades, represented by the [[File:IconInfrastructureGarrison.png|30px]] icon, allow for the construction of [[Rifle Garrison]]s (4 modifications), [[Machine Gun Garrison]]s (8 modifications), [[AT Gun Garrison]]s (12 modifications), and [[Howitzer Garrison]]s (24 modifications). |
||
| + | |||
| + | Command Modifications, represented by the [[File:IconInfrastructureCommand.png|30px]] icon, allow for the construction of [[Observation Bunker]]s (6 modifications), [[Concrete Materials|Concrete]] Structures (12 modifications), a Deployment Point (24 modifications), and the Advanced Bunkers upgrade (40 modifications). A Deployment Point allows players to spawn at that location from the Home Regions, while Advanced Bunkers allows the construction of [[Storm Cannon]]s and [[Intelligence Center]]s. |
||
| + | |||
| + | In addition, each modification has a second type represented by the Bonus Type section. For modifications with the [[File:S. Supplies.png|30px]] icon, each modification gives a 1% chance for a soldier not to consume [[Soldier Supplies]] upon respawning. This chance maxes out at 10%. Modifications with the [[File:BunkerT3ArtilleryGarrisonIcon.png|30px]] icon each give a 2% speed increase to AT Gun Garrisons and Howitzer Garrisons, with a max of 40% speed increase. On a Howitzer Garrison, this changes their response time from 10 seconds to 6 seconds. Modifications with the [[File:StormCannonIcon.png|30px]] icon each give a 1% reduction in the power cost of Storm Cannons or Intelligence centers, up to a max of 20%. Finally, modifications with the [[File:ObservationBunkerT3Icon.png|30px]] icon give a 1% range bonus to Observation towers, up to a maximum of 20%. ''Note: This range bonus is not shown on the map, but will catch players outside of the shown range, but within this bonus range.'' |
||
| + | |||
| + | {| class="wikitable" |
||
| + | |+ |
||
| + | !Name |
||
| + | !Icon |
||
| + | !Description |
||
| + | !Infrastructure Type |
||
| + | !Bonus Type |
||
| + | |- |
||
| + | |Bunks |
||
| + | |{{nowrap|[[File:FortImodBunkBedIcon.png|75px]]}} |
||
| + | |Beds stacked atop of one another. It may not look all that comfortable, but when it's time to rest, a soldier's bunk is home. |
||
| + | |[[File:IconInfrastructureGarrison.png|75px]] |
||
| + | |[[File:S. Supplies.png|75px]] |
||
| + | |- |
||
| + | |Lockers |
||
| + | |{{nowrap|[[File:FortImodBunkBedIcon.png|75px]]}} |
||
| + | |These personal storage lockers are simple and effective. |
||
| + | |[[File:IconInfrastructureGarrison.png|75px]] |
||
| + | |[[File:S. Supplies.png|75px]] |
||
| + | |- |
||
| + | |Latrine |
||
| + | |{{nowrap|[[File:FortImodLatrineIcon.png|75px]]}} |
||
| + | |A safe place for conducting business. After all, everyone has to. |
||
| + | |[[File:IconInfrastructureGarrison.png|75px]] |
||
| + | |[[File:S. Supplies.png|75px]] |
||
| + | |- |
||
| + | |Wash Station |
||
| + | |{{nowrap|[[File:FortImodDishwashStationIcon.png|75px]]}} |
||
| + | |Tidy up before a meal, wash clothes or clean dishes with a wash station. Hygiene is vital to avoid infection and disease. |
||
| + | |[[File:IconInfrastructureGarrison.png|75px]] |
||
| + | |[[File:BunkerT3ArtilleryGarrisonIcon.png|75px]] |
||
| + | |- |
||
| + | |Kitchen |
||
| + | |{{nowrap|[[File:FortImodKitchenIcon.png|75px]]}} |
||
| + | |A safe, clean space to prepare rations or scavenged food supplies. |
||
| + | |[[File:IconInfrastructureGarrison.png|75px]] |
||
| + | |[[File:BunkerT3ArtilleryGarrisonIcon.png|75px]] |
||
| + | |- |
||
| + | |Pantry |
||
| + | |{{nowrap|[[File:FortImodPantryIcon.png|75px]]}} |
||
| + | |Shelves to store rations, supplies and day-to-day tools. |
||
| + | |[[File:IconInfrastructureGarrison.png|75px]] |
||
| + | |[[File:BunkerT3ArtilleryGarrisonIcon.png|75px]] |
||
| + | |- |
||
| + | |Workstation |
||
| + | |{{nowrap|[[File:FortImodDeskIcon.png|75px]]}} |
||
| + | |A workstation that fulfills various needs. Write a letter to loved ones. Catalogue an inventory of remaining rations. Anyone can use a sturdy desk. |
||
| + | |[[File:IconInfrastructureCommand.png|75px]] |
||
| + | |[[File:StormCannonIcon.png|75px]] |
||
| + | |- |
||
| + | |Computer Module |
||
| + | |{{nowrap|[[File:FortImodModuleIcon.png|75px]]}} |
||
| + | |Deciphering coded messages sometimes requires more than just manpower alone. These state-of-the-art computer modules may just do the trick. |
||
| + | |[[File:IconInfrastructureCommand.png|75px]] |
||
| + | |[[File:StormCannonIcon.png|75px]] |
||
| + | |- |
||
| + | |Radio Station |
||
| + | |{{nowrap|[[File:FortImodRadioStationIcon.png|75px]]}} |
||
| + | |A long-range radio setup designed to get orders out in a pinch. Sometimes, there isn't enough time to deliver a message by hand. |
||
| + | |[[File:IconInfrastructureCommand.png|75px]] |
||
| + | |[[File:ObservationBunkerT3Icon.png|75px]] |
||
| + | |- |
||
| + | |Chalk Board |
||
| + | |{{nowrap|[[File:FortImodChalkBoardIcon.png|75px]]}} |
||
| + | |A simple chalkboard for operations planning. |
||
| + | |[[File:IconInfrastructureCommand.png|75px]] |
||
| + | |[[File:ObservationBunkerT3Icon.png|75px]] |
||
| + | |- |
||
| + | |Strategic Map |
||
| + | |{{nowrap|[[File:FortImodStrategicMapIcon.png|75px]]}} |
||
| + | |A board fitted with various maps of the region and useful charts. Careful planning and navigation are the keys to any successful operation. |
||
| + | |[[File:IconInfrastructureCommand.png|75px]] |
||
| + | |[[File:ObservationBunkerT3Icon.png|75px]] |
||
| + | |} |
||
| + | |||
| + | == Bunker Husk == |
||
| + | When a bunker is destroyed, it leaves behind a husk. The bunker can be rebuilt from the husk by using the hammer in upgrade mode and pressing <code>E</code>. This will replace the husk with a bunker blueprint at the tier it used to have, for the cost of that tier (e.g. shoveling for Tier 1, Hammer and 75 bmats for Tier 2). All previously installed modifications and add-ons are lost and must be reinstalled after bunker reconstruction, at normal cost. |
||
| + | |||
| + | Unlike trench husks, bunker husks cannot be filled in with a shovel. |
||
| + | |||
| + | The husk can also be destroyed with explosives, to make space for different structures for example. The bunker husk has the same max health as the bunker it comes from. Or you can wait for [[decay]] to destroy it. Husk decay cannot be prevented and is usually the same speed as the decay near region borders. |
||
| + | <br /> |
||
| + | |||
| + | ==Reservation [[File:TrenchReservationIcon.png|30px]]== |
||
| + | |||
| + | Like [[Trench]], bunkers can be reserved through a button in the upgrade menu so that only the original builder and the players in their squad can modify the bunker. The reservation lasts 48 hours but it can be refreshed at any moment by the original builder or their squad mates. |
||
| + | Only the original builder can remove the reservation. |
||
| + | |||
| + | ==Demolishing [[File:TrenchDemolishIcon.png|30px]]== |
||
| + | |||
| + | Reserved Bunkers that are less then 3 hours old can be demolished by the original builder or members of their squad through a button in the upgrade menu. There must be no enemies nearby and it doesn't work for concrete bunkers. The demolition is instantaneous and leaves no husk. |
||
| + | |||
| + | |||
| + | == Tips == |
||
| + | |||
| + | * Upgrading T1 Rifle Garrison to T2, T3 Rifle Garrison is cheaper than build T2, T3 bunker first and upgrade to Rifle Garrison. Upgrading T1 Rifle Garrison to T2 costs 75 [[Basic Materials]] and T2 Rifle Garrison to T3 costs 30 [[Concrete Materials]] like normal bunker does. |
||
| + | |||
| + | * You can hold shift while placing bunkers to prevent them from automatically connecting to another bunker or trench. |
||
| + | *"Nearby" on Infrastructure Modifications refers to trench/bunker distance not linear distance, this being within 40 unit pieces of the infrastructure modification. |
||
| + | *When a bunker is destroyed every infantry in it dies. Even vehicles that touches the bunker might be instantly destroyed. |
||
| + | * Infrastructure Modifications can be placed on bunker pieces who already have a bunker garrison upgrade (Rifle Garrison, etc). |
||
| + | |||
| + | == Gallery == |
||
| + | <gallery heights="200" mode="packed"> |
||
| + | File:Howitzer Garrison image.png|Howitzer Garrison and a soldier carrying a Storm Cannon shell. |
||
| + | File:Bunker blueprint.jpg|Bunker Blueprint, Shovel required to build. |
||
| + | File:Storm Cannon Image.jpg|Storm Cannon. |
||
| + | File:Engine Room Image.jpg|Engine Room. |
||
| + | File:Bunker & Trench showcase.jpg|Various upgrades: (in order) Tier 1 Garrison, Tier 2 Machinegun, Tier 3 AT, Engine room; Firing Ports, Doorway, [[Trench|Trenches]] with [[Trench#Barbed Wire|Barbed Wire]], a [[Trench#Trench Bridge|Trench Bridge]], and [[Trench#Pipes|Pipes]]. |
||
| + | File:Engine room-critical.png|Engine room adversely affects integrity. |
||
| + | File:Bunker-Trench Connection.jpg|Trench's length is equal to two connected bunker's length. |
||
| + | File:Bunkerandtrench wetconcrete.jpg |
||
| + | File:Trench Bunker Husk.png|Tier 1 Trench and Bunker husks. |
||
| + | File:Bunker Upgrade Menu Description.png|Bunker upgrade descriptions list Structural Integrity Rating, construction requirements, power consumption, and building cost. |
||
| + | </gallery> |
||
| + | |||
| + | == Tutorial Video == |
||
| + | {{#ev:youtube|56q4jduas3U|300}} |
||
| + | |||
| + | {{#ev:youtube|q3KfYdX1pN8|300}} |
||
| + | |||
| + | {{#ev:youtube|BkqdyK5AAZ4|300}} |
||
| + | |||
| + | {{Buildings Navbox}} |
||
[[Category:Bunkers]] |
[[Category:Bunkers]] |
||
| + | [[Category:Protections]] |
||
| + | [[Category:Shovel Construction]] |
||
Revision as of 19:30, 17 January 2022
This article could contain outdated information that is inaccurate for the current version (1.52) of the game. It was last updated for 0.47.
| “ | An underground shelter that serve as foundation for permanent fortifications. Connects to other Bunker and Trenches. | „ |
| — In-game description |
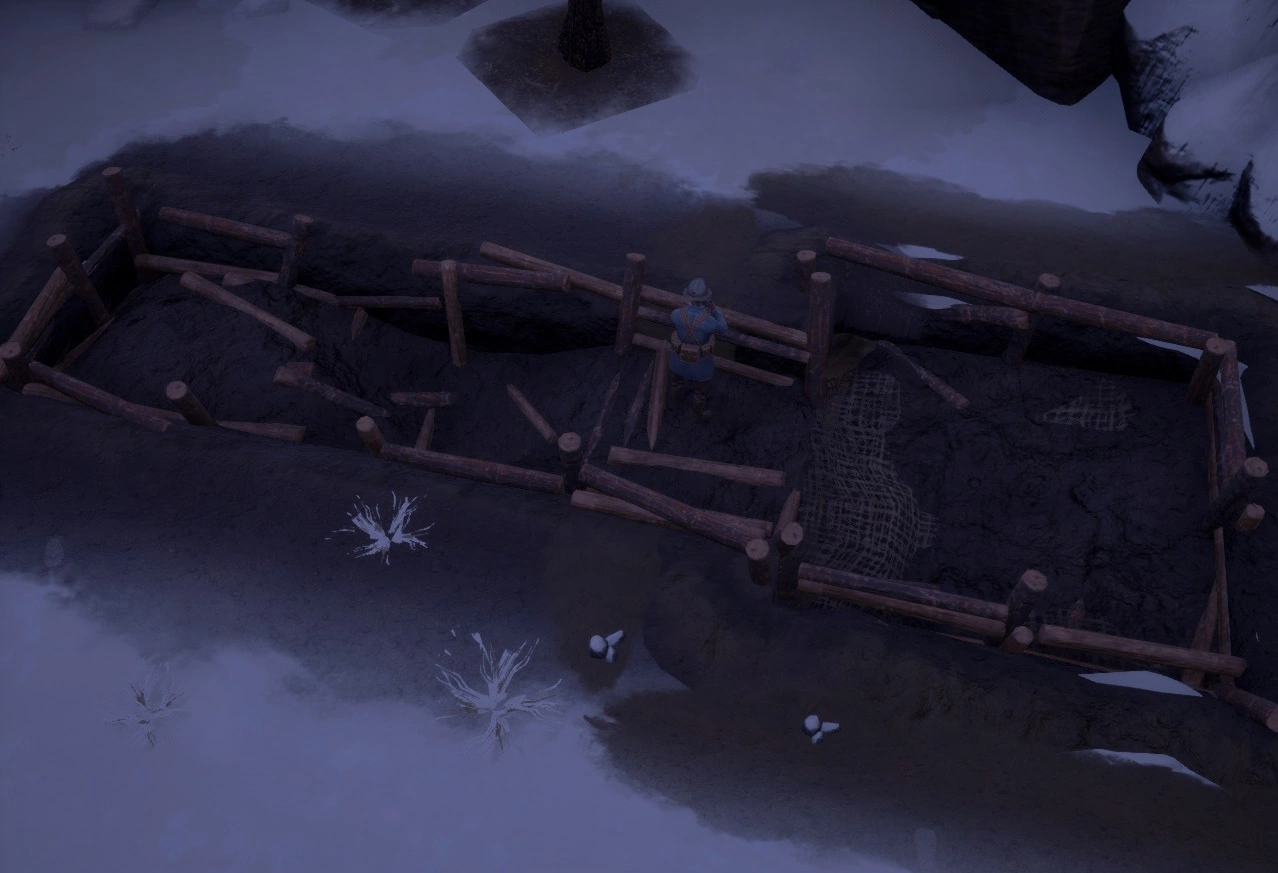
The Bunker is a player made rectangle structure, partly in the ground. There exist 3 tiers of bunkers; the first is dug with a Shovel, the second is upgraded via Basic Materials and the third tier costs Concrete Materials and a significant amount of time to cure. They can be upgraded with add-ons or converted to other types of structures like garrisons. Bunkers can also be connected to Trenches.
Description
The Bunker can be made by equipping a shovel and opening the build menu (default: B). You can rotate the bunkers as you would with normal structures, but it can also snap to bunkers or to trenches (hold Shift to disable snapping). If you directly join two bunkers together, the wall between them disappears and the two sections become one single structure with shared health. If one of the parts gets destroyed, they all get destroyed.
There is no limit on the amount of bunkers you can link together, however, their Structural Integrity will decrease. This results in the structure having less health; the health of a 2-bunker structure is lower than the sum of the health of two separate single bunkers. The Structural Integrity will decrease quicker for low tier bunkers than for higher tiers.
Bunkers can be repaired using a hammer and Basic Materials. Upgrading a T1 bunker into a garrison or into Tier 2 requires Basic Materials. Tier 3 bunkers require Concrete Materials.
Bunker Corners are an alternative type of Bunkers in a some-what triangular rather than square shape.
Structural integrity
When you go into the upgrade-mode, you can see bunker's approximate structural integrity in text such as high, medium, low, and critical.
The max health of a bunker structure is equal to the sum of the max health of each directly-connected bunkers multiplied by the structural integrity value.
| Text | Value (approx) |
|---|---|
| High | 100%~75% |
| Medium | 75%~50% |
| Low | 50%~25% |
| Critical | Under 25% |
Factors affecting structural integrity include:
- Bunker tier (higher tier keep higher integrity)
- Number of connected bunkers (the more pieces, the lower the integrity)
- Number of bunker garrisons, ammo rooms, and engine rooms (they decrease integrity)
Factors that do no affect structural integrity: shape of the bunker and add-ons.
You should never let your bunkers reach Critical as your bunker's health and repair costs will suffer. Reaching Low is not advised, and adding more bunker pieces past Low integrity does not give more health to your bunker.
As a rule of thumb, a Tier 1 Bunker should not use more than 4 pieces and never more than 7. Tier 2 Bunker should not use more than 12 pieces and never more than 20. Tier 3 Bunkers are such that the number of pieces is virtually not an issue.
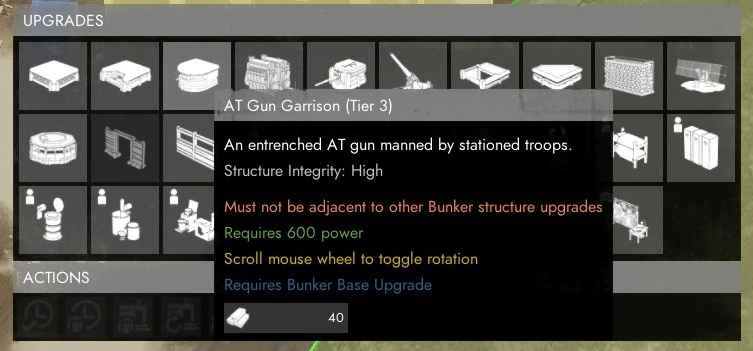
When modifying a bunker, each upgrade's description mention a "Structural Integrity Rating" to indicate the relative impact of each type of modification on the Structural Integrity. "High - High" means a relatively low impact whereas "High - Critical" means a very significant decrease in structual integrity.
Upgrading Bunkers
The hammer needs to be equipped to upgrade Bunkers. Press F to switch the hammer to Upgrade Mode. When next to a bunker, aim at it and press the "use" key (default keybind E) to open the bunker upgrades menu. For options that have a direction put your cursor on the particular option and use the Mouse Wheel to choose the desired direction. Press LMB to select the option. If the upgrade is simply an Add-On, it will be installed after your character does a short animation (and if you have the required materials). For other upgrades you must hit the blueprint with your hammer while having the required materials in your inventory. If the blueprint is shot enough before it is completed, it will turn back into the original building.
Tier Upgrades
| Tier 1 | Tier 2 | Tier 3 |
|---|---|---|
 Bunker |
 Bunker |
 Bunker |
| Required tool: Shovel | Hammer | Hammer |
| Cost: N/A | 75 Basic Material | 30 Concrete Materials |
Add-ons
Similar to the Trench, the bunker can be upgraded with a set of add-ons. The upgrades consists of Pipes, a door and a firing hole. The latter two can be build on all sides of the bunker by scrolling the mouse wheel; the door requires to be connected to a trench. Building the add-ons is similar to upgrading, but when selected your character will go into a short construction animation after which the add-on will appear. The materials will automatically be taken from your inventory.
| Name | Icon | Description | Cost |
|---|---|---|---|
| Doorway |   
|
Provides entry into this Bunker. | 20 |
| Firing Port |   
|
Allows infantry weapons to be fired from the safety of this bunker. | 20 |
| Pipes | 
|
Provides power connections from Engine Rooms to Storm Cannons. | 30 |
| Interior Firing Port | 
|
Provides cover against enemies that have entered this Bunker. Tier 3 only. | 10 |
| Stairs | 
|
Allows easy access to the roof of this bunker. Only Tier 2 and 3. | 30 |
| Ladder | 
|
Permits access into this Bunker from the roof. | 30 |
| Sandbags | 
|
Bunker Sandbags gives a secure firing position on the roof while preventing enemies from climbing onto your bunker. | 10 |
Modifications
Beside upgrading the tier or placing add-ons, the Bunker can also be modified. This ranges from adding a spawn point with the Bunker Base to adding active defenses, as well as placing the mighty Storm Canon. Below you can find a list of all the various modifications. It should be noted that some defenses cannot be constructed on all tiers. There is no way to remove a modification from a bunker. Placing a modification will erase all add-ons and infrastructure modification placed in that bunker; the spent materials will be lost.
When adding Garrisons to your bunker complex, be aware that they cannot be directly adjacent to each other. There can also only be one Bunker Base per complex.
| Name | Tiers | Icon | Description |
|---|---|---|---|
| Bunker Base | 1-3 |   
|
A large forward operating base. Players can spawn and stockpile items here. Only buildable on T1 bunkers. |
| Bunker Ramp | 1-3 |   
|
A ramp that provides access to underground Bunkers. |
| Bunker Corner | 2-3 |  
|
Makes the bunker triangular. Tier 1 built with shovel. |
| Rifle Garrison | 1-3 |   
|
An entrenched bunker manned by stationed troops armed with Rifles. |
| Machine Gun Garrison | 1-3 |   
|
An entrenched Machine Gun emplacement manned by stationed troops. |
| AT Gun Garrison | 2-3 |  
|
An entrenched AT gun manned by stationed troops. |
| Observation Bunker | 2-3 |  
|
A radio bunker that provides intel to friendly units about the surrounding area. Reinforced with wood, it can withstand more punishment than a standard radio tower, and therefore is capable of increased effectiveness. |
| Engine Room | 2-3 | 
|
A engineering facility that provides power to Bunker structures using pipe connections. |
| Ammo Room | 3 | 
|
A Bunker Room designed to hold large amounts of artillery shells. Shell crates can be submitted there directly. |
| Howitzer Garrison | 3 | 
|
An entrenched Howitzer emplacement manned by station troops. |
| Storm Cannon | 3 | 
|
A heavy fixed position artillery that can release devastating firepower on distant enemy targets. Requires 3 by 3 bunker complex to be build. |
| Intelligence Center | 3 | 
|
A high-tech listening post designed to intercept and decode enemy transmissions. The intelligence Center can target distant locations and will continue to decipher sensitive transmissions over a sustained period. |
Infrastructure Modifications
Within the Upgrades section there are also Infrastructure Modifications, a list of which can be found in the table below. Depending on their Infrastructure Type, they give different upgrades. Each Infrastructure Modification gives 1 modification point and costs 50 ![]() to build.
to build.
Garrison Upgrades, represented by the ![]() icon, allow for the construction of Rifle Garrisons (4 modifications), Machine Gun Garrisons (8 modifications), AT Gun Garrisons (12 modifications), and Howitzer Garrisons (24 modifications).
icon, allow for the construction of Rifle Garrisons (4 modifications), Machine Gun Garrisons (8 modifications), AT Gun Garrisons (12 modifications), and Howitzer Garrisons (24 modifications).
Command Modifications, represented by the ![]() icon, allow for the construction of Observation Bunkers (6 modifications), Concrete Structures (12 modifications), a Deployment Point (24 modifications), and the Advanced Bunkers upgrade (40 modifications). A Deployment Point allows players to spawn at that location from the Home Regions, while Advanced Bunkers allows the construction of Storm Cannons and Intelligence Centers.
icon, allow for the construction of Observation Bunkers (6 modifications), Concrete Structures (12 modifications), a Deployment Point (24 modifications), and the Advanced Bunkers upgrade (40 modifications). A Deployment Point allows players to spawn at that location from the Home Regions, while Advanced Bunkers allows the construction of Storm Cannons and Intelligence Centers.
In addition, each modification has a second type represented by the Bonus Type section. For modifications with the ![]() icon, each modification gives a 1% chance for a soldier not to consume Soldier Supplies upon respawning. This chance maxes out at 10%. Modifications with the
icon, each modification gives a 1% chance for a soldier not to consume Soldier Supplies upon respawning. This chance maxes out at 10%. Modifications with the ![]() icon each give a 2% speed increase to AT Gun Garrisons and Howitzer Garrisons, with a max of 40% speed increase. On a Howitzer Garrison, this changes their response time from 10 seconds to 6 seconds. Modifications with the
icon each give a 2% speed increase to AT Gun Garrisons and Howitzer Garrisons, with a max of 40% speed increase. On a Howitzer Garrison, this changes their response time from 10 seconds to 6 seconds. Modifications with the ![]() icon each give a 1% reduction in the power cost of Storm Cannons or Intelligence centers, up to a max of 20%. Finally, modifications with the
icon each give a 1% reduction in the power cost of Storm Cannons or Intelligence centers, up to a max of 20%. Finally, modifications with the ![]() icon give a 1% range bonus to Observation towers, up to a maximum of 20%. Note: This range bonus is not shown on the map, but will catch players outside of the shown range, but within this bonus range.
icon give a 1% range bonus to Observation towers, up to a maximum of 20%. Note: This range bonus is not shown on the map, but will catch players outside of the shown range, but within this bonus range.
| Name | Icon | Description | Infrastructure Type | Bonus Type |
|---|---|---|---|---|
| Bunks | 
|
Beds stacked atop of one another. It may not look all that comfortable, but when it's time to rest, a soldier's bunk is home. | 
|
|
| Lockers |
|
These personal storage lockers are simple and effective. |
|
|
| Latrine | 
|
A safe place for conducting business. After all, everyone has to. |
|
|
| Wash Station | 
|
Tidy up before a meal, wash clothes or clean dishes with a wash station. Hygiene is vital to avoid infection and disease. |
|
|
| Kitchen | 
|
A safe, clean space to prepare rations or scavenged food supplies. |
|
|
| Pantry | 
|
Shelves to store rations, supplies and day-to-day tools. |
|
|
| Workstation | 
|
A workstation that fulfills various needs. Write a letter to loved ones. Catalogue an inventory of remaining rations. Anyone can use a sturdy desk. | 
|
|
| Computer Module | 
|
Deciphering coded messages sometimes requires more than just manpower alone. These state-of-the-art computer modules may just do the trick. |
|
|
| Radio Station | 
|
A long-range radio setup designed to get orders out in a pinch. Sometimes, there isn't enough time to deliver a message by hand. |
|
|
| Chalk Board | 
|
A simple chalkboard for operations planning. |
|
|
| Strategic Map | 
|
A board fitted with various maps of the region and useful charts. Careful planning and navigation are the keys to any successful operation. |
|
|
Bunker Husk
When a bunker is destroyed, it leaves behind a husk. The bunker can be rebuilt from the husk by using the hammer in upgrade mode and pressing E. This will replace the husk with a bunker blueprint at the tier it used to have, for the cost of that tier (e.g. shoveling for Tier 1, Hammer and 75 bmats for Tier 2). All previously installed modifications and add-ons are lost and must be reinstalled after bunker reconstruction, at normal cost.
Unlike trench husks, bunker husks cannot be filled in with a shovel.
The husk can also be destroyed with explosives, to make space for different structures for example. The bunker husk has the same max health as the bunker it comes from. Or you can wait for decay to destroy it. Husk decay cannot be prevented and is usually the same speed as the decay near region borders.
Reservation 
Like Trench, bunkers can be reserved through a button in the upgrade menu so that only the original builder and the players in their squad can modify the bunker. The reservation lasts 48 hours but it can be refreshed at any moment by the original builder or their squad mates. Only the original builder can remove the reservation.
Demolishing
Reserved Bunkers that are less then 3 hours old can be demolished by the original builder or members of their squad through a button in the upgrade menu. There must be no enemies nearby and it doesn't work for concrete bunkers. The demolition is instantaneous and leaves no husk.
Tips
- Upgrading T1 Rifle Garrison to T2, T3 Rifle Garrison is cheaper than build T2, T3 bunker first and upgrade to Rifle Garrison. Upgrading T1 Rifle Garrison to T2 costs 75 Basic Materials and T2 Rifle Garrison to T3 costs 30 Concrete Materials like normal bunker does.
- You can hold shift while placing bunkers to prevent them from automatically connecting to another bunker or trench.
- "Nearby" on Infrastructure Modifications refers to trench/bunker distance not linear distance, this being within 40 unit pieces of the infrastructure modification.
- When a bunker is destroyed every infantry in it dies. Even vehicles that touches the bunker might be instantly destroyed.
- Infrastructure Modifications can be placed on bunker pieces who already have a bunker garrison upgrade (Rifle Garrison, etc).
Gallery
Howitzer Garrison and a soldier carrying a Storm Cannon shell.
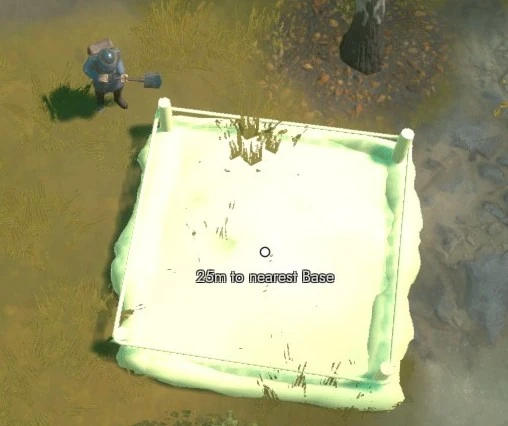
Bunker Blueprint, Shovel required to build.
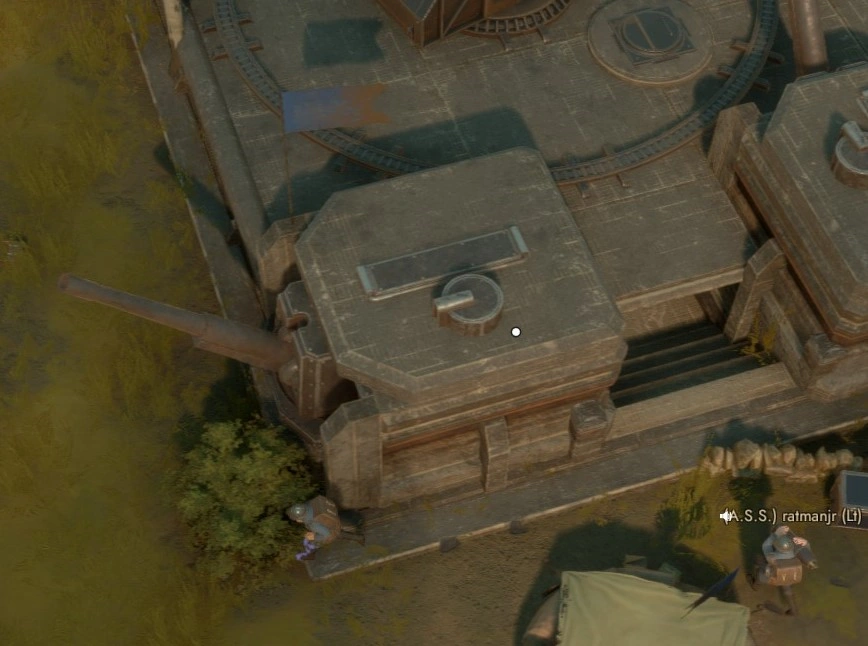
Storm Cannon.
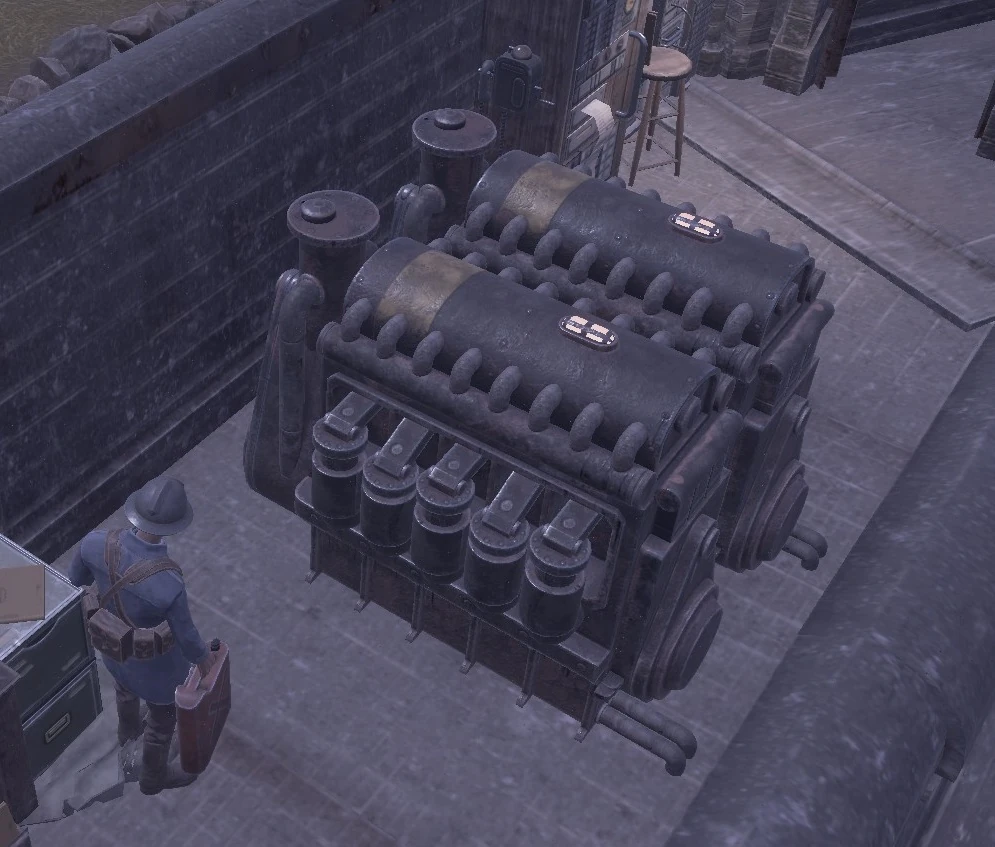
Engine Room.
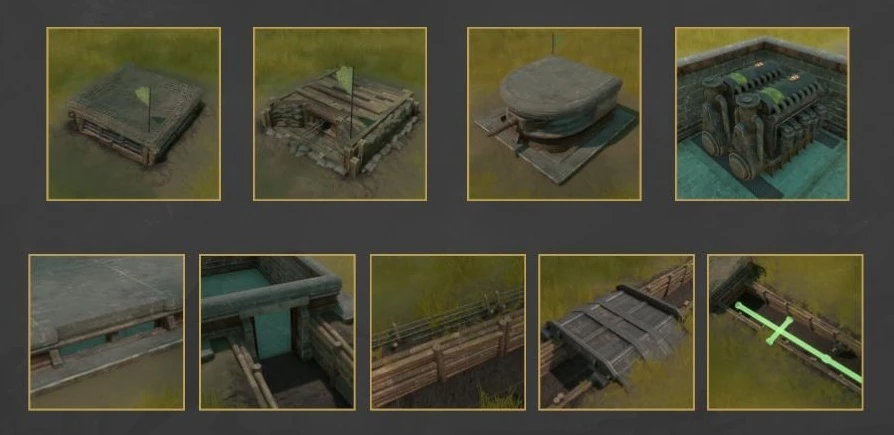
Various upgrades: (in order) Tier 1 Garrison, Tier 2 Machinegun, Tier 3 AT, Engine room; Firing Ports, Doorway, Trenches with Barbed Wire, a Trench Bridge, and Pipes.
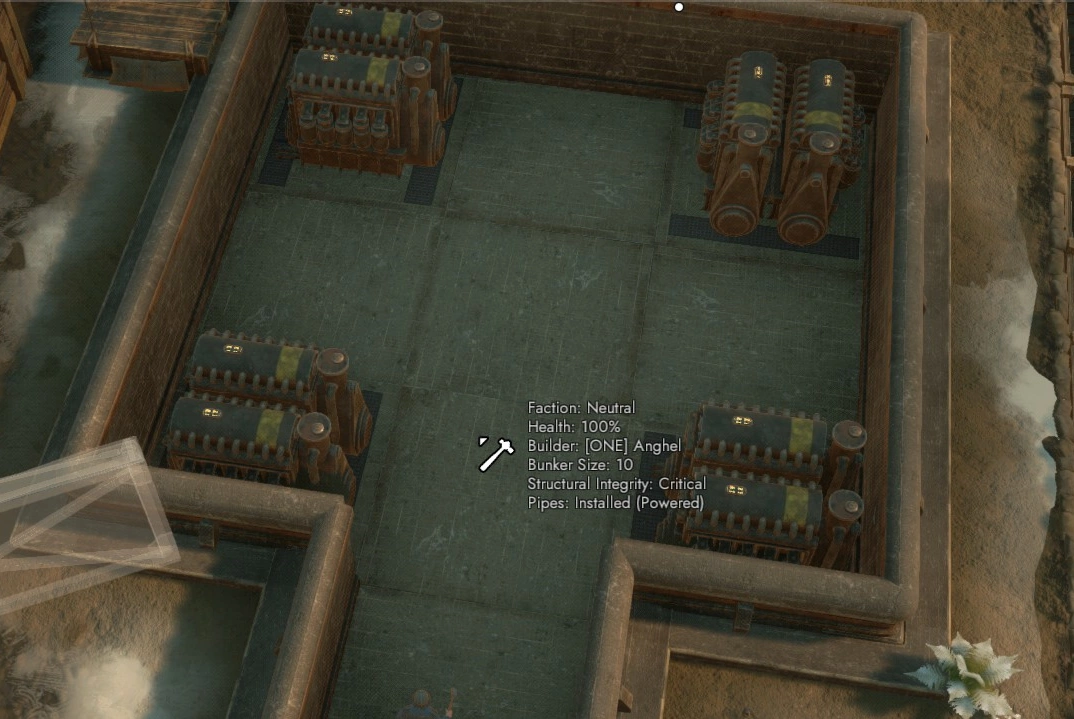
Engine room adversely affects integrity.
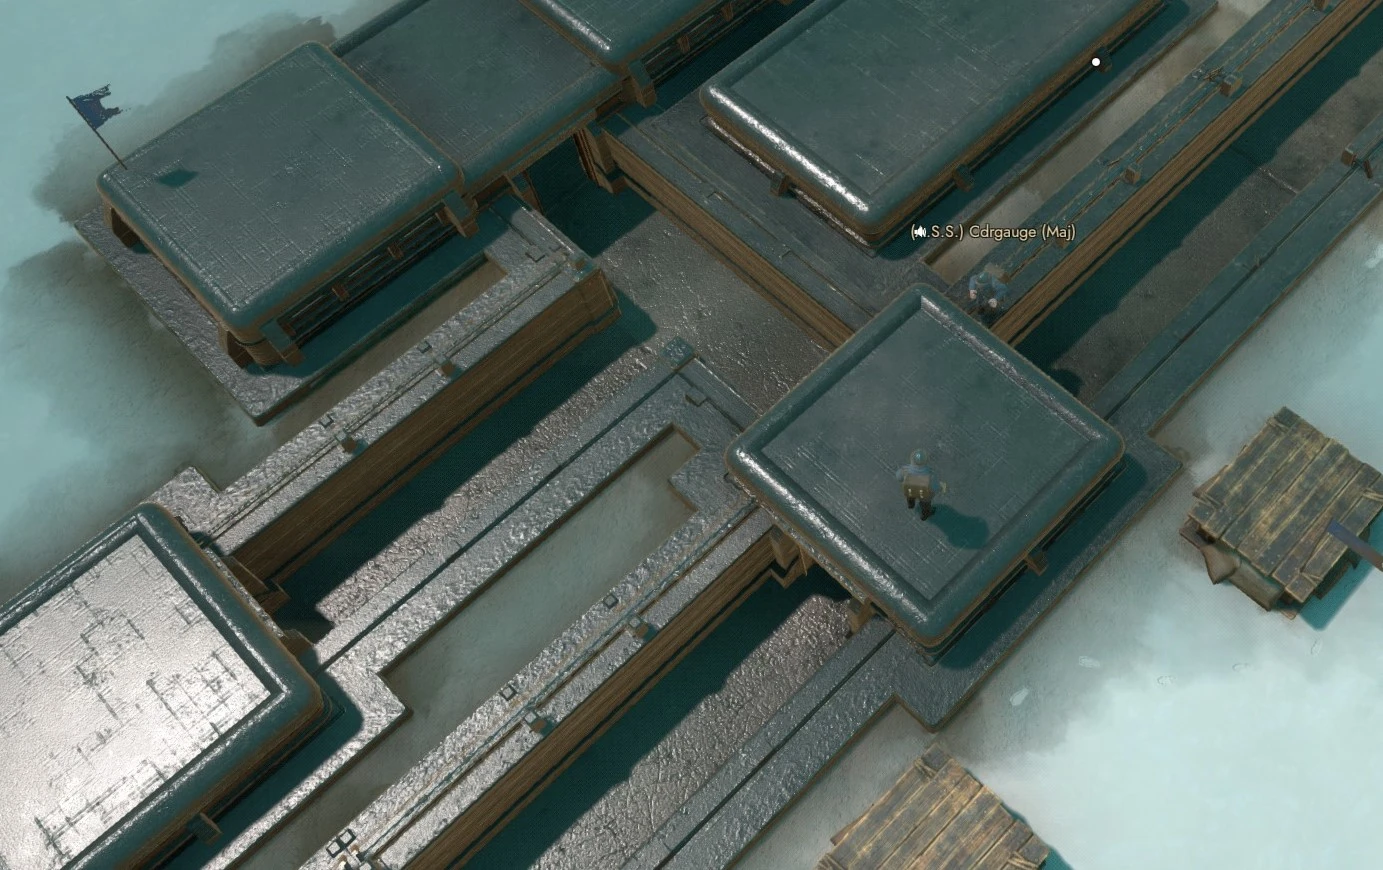
Trench's length is equal to two connected bunker's length.
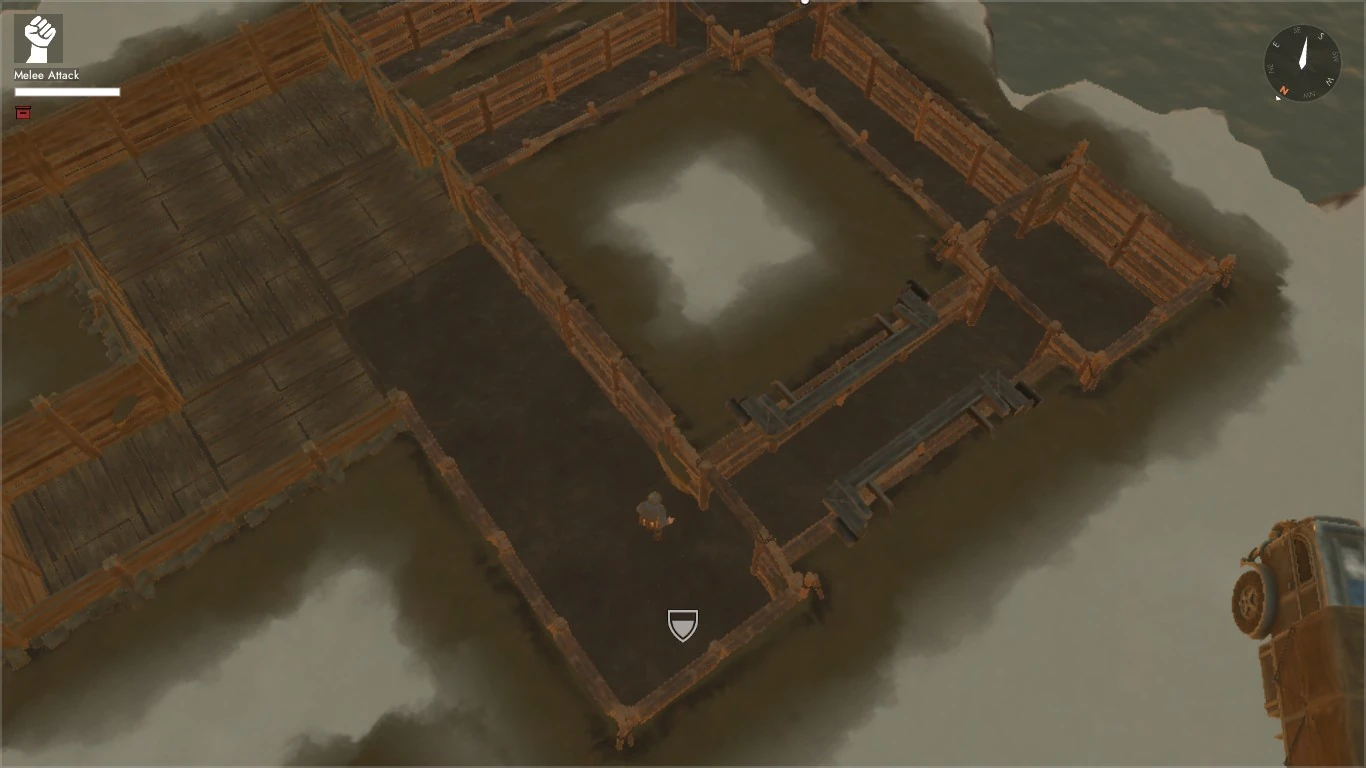
Tier 1 Trench and Bunker husks.
Bunker upgrade descriptions list Structural Integrity Rating, construction requirements, power consumption, and building cost.

Tutorial Video
| ||||||||||||||||||||||||||||||||||||||||||||